8.31.2011

in the kitchen: banana "ice cream"


So if you're like me, you love ice cream but hate the calories that go with it.  Or maybe I'm the only one who remains incredulous that a mini-sized Blizzard still has over 400 calories.  Hello, it's a MINI!!!

I tried making fake banana ice cream last summer after reading about it in a magazine, and while it was tasty, it wasn't really a satisfying substitute for me.  I missed that creamy, smooth texture you can only get from ice cream.

Then the other day, I saw Rachael Ray make fake banana ice cream on TV, and it turns out all you have to do is add a little milk to the bananas.  Duh.  Why didn't I think of that?  So tonight I tried it, and the outcome looked exactly like Rachael's.  Score.

What was really amazing was that I only used one banana and maybe 1/4 cup of lowfat milk, and I got a bowlful of "ice cream."  Way more of a serving than I was expecting, and it completely satisfied my ice cream craving for a fraction of the calories (along some healthy doses of potassium and calcium, for that matter!).

Interested?  Here's the recipe.  This one's real easy to adjust according to the number of servings...I'd figure about a banana per person.  A few words of caution though...

  • Your food processor WILL jump around the counter for the first 20 or 30 seconds of pureeing.  Just be brave and ride it out, and maybe add a little more milk to soften those rock-hard banana pieces.  It might also help to cut the banana into smaller chunks before you freeze it, but I think either way it packs a punch in the beginning.
  • It really does take about two minutes of pureeing and adding small amounts of milk before it gets creamy.  Totally worth it though. 
  • And finally, obviously the riper the banana is before you stick it in the freezer, the more "banana-y" your ice cream will taste.  Since I don't like a really strong banana flavor, I chose a banana that was just starting to get its spots, and the result wasn't at all overpowering.  A light drizzle of chocolate syrup doesn't hurt either.  :o)

Enjoy!

Linked up to Creations by Kara and A Little Tipsy!

8.30.2011

fall leaves pillow cover


You may have read in a previous post that I am SO ready for fall to get here.  Here's a project I finished up today in anticipation of my favorite season!  Oh, and plus I have a TON of fabric scraps that really need to be used for something.


This may not look like a lot of scraps to you, but trust me, this basket is stuffed almost beyond capacity!

A couple of months ago, I came across this pillow over at Cluck Cluck Sew and really wanted to do one of my own.  So this week, I grabbed some fall-colored scraps out of my scrap basket and got to town.


I decided to make a pillow slipcover so that I could change it out easily and not have to worry about putting the whole pillow somewhere during other seasons.  I also decided to use some of the canvas from the dropcloth I bought for this project, since I figured that would make a nice backdrop for the leaves.

I used iron-on adhesive to make the tree trunk and leaves stick to the canvas, and then sewed the edges to make sure they would stay put.


Then I just cut two pieces for the back and sewed everything together; I followed these directions over at Make It and Love It to get all the measurements right.  And bonus:  I got to use the hemmed edges of the dropcloth for the back pieces, so that let me skip the whole process of hemming them myself.

Once I was done, I turned it right-side out and stuffed my pillow form in.  Done.


I really like how it turned out, especially because I didn't have to buy anything to make it.  Always a good thing.

Linked up to Creations by Kara and A Little Tipsy!

8.26.2011

scrapbook paper organizer


Okay, this is just genius.

Does your scrapbook/craft closet look like this?


Or maybe you're lucky enough to have a whole room dedicated to these kind of pursuits.  Anyway, I haven't scrapbooked in a LONG time, but I've been meaning to get back into it, if only to finally order prints of my son's first 20 months and put them in an album already!  When I did scrapbook on a regular basis, I bought packs of paper when I saw it on clearance (or in places like Ross or Goodwill, believe it or not!).  All that paper ended up being crammed into this big white box.


Which was falling apart, incidentally.  Clearly I needed a better system.

One night, I found this solution on pluckymomo during some insomniac craft blog browsing.  This blog has a ton of brilliant ideas (check out her awesome picnic play mat under "tutorials") and a great playlist to boot.  When I saw her idea for a scrapbook paper organizer, I knew I wanted to try it.

So I ordered a set of those white wire storage grids from Walmart's website since they're not available in the store (at least they have site to store!).  They were around $16, which is more than I usually spend on just about anything, but given the fact that most of my storage containers come from the dollar store, I figured I could splurge just this once.  They arrived at my store today, so I went and picked them up along with some zip cable ties in the hardware section.


Once my kid went down for a nap, I got to work.  Turns out this is SO easy.  The only tedious part is fastening all the cable ties and then snipping off the excess when you're done.  Just one episode of Phineas and Ferb a cooking show, and I was done.  I got out my paper and started filling the shelves.


How cool is that??


I mostly organized mine by color.  I love how it's so much easier to thumb through the stacks now, rather than dumping all the paper out of a box to see what I have.  I had to rearrange some stuff in the closet to make it fit (the grids each measure a little over 14" square), but doing so sparked a total re-organization of the entire closet, so that's always a good thing.


Ahhhh.  Much better.  Let the scrapbooking begin.  :o)

Linking up to Creations by Kara!

8.24.2011

the "is it fall yet?" table runner


So who else is ready for fall?  I sure am.  I want to make soup and wear scarves and eat things that taste like pumpkin.  And even though fall in the south is usually very brief, I always make the most of it.  What's wrong with bringing out fall decorations in September?  I don't see any problem with it.  And I'm going to be even crazier and show you a fall table runner I made this week...in August.  Crazy, right?

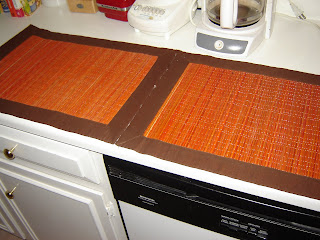
Recently I found a set of four placemats at Ross for $3.49.


They caught my eye because of their fall colors, but my table seats six.  Plus we're taking a temporary hiatus from placemats since my kid likes to take them off the table and mess with them, though most of the time he ends up handing them right back to me.  Still, not worth the hassle right now.

So I decided to try to piece them together to make a table runner instead.  Given the dimensions of my table and the placemats themselves, I realized that the runner only needed to be two placemats long, so I used hot glue to stick them together.


And because they were cheap placemats, they didn't line up perfectly.  But I figured that would happen.  I thought about hot-gluing a piece of ribbon or a strip of fabric down the middle to cover up that messy seam, but I didn't have any on hand that coordinated with the brown and orange of the placemats.  So I took the easy (and hopefully just as aesthetically pleasing) route and centered a third placemat in the middle.  Once I had it where I wanted it, I hot-glued it down.


And there you go.  A table runner in under five minutes.


So what do you think?  I have one placemat leftover, and I'm thinking of making a cute door hanging out of it as opposed to the traditional fall wreath with leaves on it.  If I do, I'll probably have to wait till everyone else in the neighborhood brings out their jack o'lanterns and stuff so I don't look silly.  For now we'll keep the early fall insanity behind closed doors.  :o)

Linking up with Creations by Kara and A Little Tipsy!

8.23.2011

cheap framed monogram


Okay, I know it's been a few weeks since my last post.  Life does seem to get in the way sometimes, but hopefully this will make up for my absence!

For over a year, Hobby Lobby had some pretty metal letters hanging up that I loved, but the price tag wasn't as good.  Even with a 40% off coupon, they seemed overpriced to me.  Sometime this year these letters were moved to clearance, but I never really noticed an "I" being among them since there was SO much other stuff in those aisles.

Then a few weeks ago, I spotted one of these letters.  And it just happens to be the first letter of our last name.


What?!  This was in clearance the whole time and I never saw it?  I was happy to see it wasn't too scratched up from being moved around so much.  The best part was the price though.


Yep.  $1.20.  And since that was like the sixth or seventh clearance sticker on there, it seems that it was a good thing that I didn't see it before now.  The original clearance sticker said this:


I think we're looking at $8.50 here.  As the original "clearance" price.  Craziness.  Under two bucks is much more my speed, and it was just so gratifying to hand the clerk two dollars rather than swiping the debit card!

Anyway, I thought the letter looked a little plain on its own, but I didn't want to spray-paint it or anything since I really liked the look of the metal.  So I pulled a large frame out my stash and spray-painted that instead.  I figured hanging the frame around the initial would make it pop a little.  I'm so glad I had this "Lagoon" color leftover from my keyholder.  LOVE IT.


So the total for this project: $1.20 plus tax, since I already had the spray paint and the frame was free from my mom.  Not too shabby.

I'm thinking I'll hang it in my mudroom since that lagoon color matches other stuff in there.  There's still a big blank wall to the right as you walk in, so I might try to do a frame collage there, with this monogram being in the center.  I'm certainly not at a loss for frames right now, it's just a matter of spray-painting them to match and figuring out a layout!  Stay tuned.  :o)

Linking up with Creations by Kara and A Little Tipsy!

8.05.2011

yep...more nursing covers!


You may remember I recently made a nursing cover for a friend.  Like last week.  So what would possess me to make four more in the last two days?  Maybe I'm crazy.  Or maybe our town's consignment sale is coming up and one of my friends convinced me to try to sell some there.  Or maybe it's a combination of the two.

My friend really thinks nursing covers should sell pretty well at the sale, so I did a marathon sewing session over the last two days (or two naptimes, really).  Most of the fabric that I used was already in my stash, which was good given the short notice, and the additional items I had to purchase (like the boning and the rings for the straps) didn't result in that much out of pocket.  All I can say is, yay for coupons and sales happening at just the right time!


Yep, this is leftover fabric from some valances I made.  Still IN LOVE with this pattern.  Something about green and brown together is just so calming.


I love the pattern on this one too...not sure what you call it, but I like it!


This cover is a little lighter than the others, but still very sturdy.  I love the little pinstripes and the summery look the linen border gives it.


At first I wasn't sure if I made the right decision with the fabrics on this one, but I'm so glad I went with my gut.  I think the pink border really brightens up the cover since the body of it is so dark.

So what do you think?  I was actually lucky to get pictures of these, since our camera's acting up and doesn't like to work for that long.  And when it does work, it takes pretty crummy pictures.  Maybe if these covers sell we can put that money toward a new camera.  One can only hope.  :o)

Related Posts Plugin for WordPress, Blogger...