Showing posts with label paint. Show all posts

9.25.2014

fall decor on the cheap

Fall is officially here!  So I decided to dress up our fireplace mantle a bit.

I found a small bag of funny gourds at Walmart for around three bucks.  I made sure they didn't have any yucky brown spots on them, and that at least a couple of them would stand up on their own.  Then I grabbed some googly eyes and the hot glue gun (turns out Elmer's is useless is this case) and went to town!  I also used a Sharpie to add more facial features.


Then I really got crazy and pulled out some simple chipboard triangles I had picked up at least two years ago.  My vision had been a candy-corn garland all along, but for some reason I never got around to doing it.  I still have some acrylic paint in fall colors that's in good shape, so I painted the triangles one color at a time, making sure to let each coat dry inbetween (it didn't take long).  I didn't bother with painters tape because real candy corn looks a little muddled, so why shouldn't my garland look that way too?  I used some twine we had on hand to hang it up once it dried:


Very pleased with how it turned out!  :o)  Welcome fall!!

3.13.2014

Micah 6:8

Today I made one last thing for Micah's room.


It's a paraphrase of Micah 6:8; I came across it when I was pregnant and really wanted to eventually incorporate it into his room.  I used a frame I already had, as well as the wrapping paper from this project.  I had a lot of letter stickers left from the other hangings in the room too.  In the end it just came down to getting the handprint and footprint from Micah.  Which is easier said than done with a five-month-old.  He wanted to make a fist and curl his toes more than helping me out on this one.  :o)  So we did the best we could, and then I used one of Caleb's paintbrushes to fill in the muddled spots.  I actually used Caleb's paint too...it's non-toxic and washable, so I thought it was a pretty good option for something involving a baby. 

I'm about 90% happy with it.  Kinda wish I had used lighter-colored letters so they'd pop more against the navy blue cardstock, but since I wanted to use stuff I already had I'm okay with it for now.  We could always try again further down the road when Micah's a little older (and more cooperative with art projects!), but for now this complements the rest of the stuff in his room nicely.  Plus it adds another Scripture to his walls, so that's always a great thing in my book.  :o)

11.02.2012

pinspired: painting with kool-aid

This morning my son and I tried a new idea I keep seeing on Pinterest...painting with Kool-aid!!  We experimented with both name-brand and store-brand.  :o)


I eyeballed a couple of tablespoons' worth of each flavor in the muffin tin, then attempted to instruct my almost three-year-old on proper painting technique (in this case, it's recommended they first dip their paintbrush in water, then in the Kool-aid powder).


My kid tends to stick with one color at a time....and at the moment finger-painting is out.  He doesn't mind getting messy, but he prefers paintbrushes right now.  I painted with the other colors to see how they turned out.


After he saw that, there was no turning back.


He usually ends up messing with the water when he paints, so after awhile the colors got a little diluted.  I did notice that the store-brand flavors (lemonade and grape) were less vibrant then.  But the name-brand flavors (cherry and lemon-lime) stayed pretty bright.  So it might be worth investing the 20 cents a packet for name-brand (as opposed to 12 cents for store-brand!).


So what's the verdict?


I think he likes it!

Pros:  Cheap.  Easy.  Vibrant colors.  Smells AMAZING.  

Cons:  Some colors dilute easily.  Might stain skin and/or clothing (my kid didn't use his hands to paint, but did get some on his face.  None of it got on his clothes from what I can see so can't make a call about how washable the Kool-aid is).  Since it smells good, some kids might want to eat it (which isn't terrible, but you'd have to teach them that not all paint is edible!).

All in all, we both really liked this activity and will definitely do it again!

9.03.2012

pinspired: tiered cake pan stand


A few days ago, I finally tried out a DIY I've had bookmarked for awhile: an adorable tiered stand made out of cake pans and candlesticks.  My inspiration can be found on this blog.  The most difficult part was finding cake pan sets in different sizes.  And for some reason, as soon as I decided to be on the lookout for brass candlesticks, I couldn't find them at Goodwill anymore.  EVERY OTHER TIME I've been there, tacky brass candlesticks were always gracing the shelves.  Go figure.

Anyway, I found a set of cake pans on Ebay for pretty reasonable, and got a wooden candlestick at Hobby Lobby and just spray-painted it a cheerful red.  As for the glue, I used that scary E6000 adhesive.  It has warnings all over it, and apparently there's an ingredient in it that was found to cause cancer in California (says so on the label).  But since I don't live in California, I figured the glue couldn't give me cancer so I went ahead and used it.

I kid.  :o)

The gluing went off without a hitch (though it did come with some serious fumes...yuck), and it did hold everything very well.

So here's the stand after I let it dry a day or two:


I think it looks cute.  But it's a little flimsy.  I don't think my pans are as sturdy as the ones used in the original tutorial.  Hers were nice and rustic looking, and just look stronger than the ones I used.  So my stand is visually appealing and does hold stuff, but not very well.  It would be fine to hold stuff if I didn't have to take the items off and put them back on a lot, since it shakes a little every time I mess with it. Oh well, you live and you learn.  At least now I can be on the lookout for something stronger since I know how easy this thing is to put together once you have everything.  It looks really nice in my kitchen even if it's not as functional as I'd like!

7.16.2012

upcycled laundry sign


Over the weekend I finally finished a project that I've had in mind for awhile.  It started with this $3.00 sign I found at TJ Maxx last year:


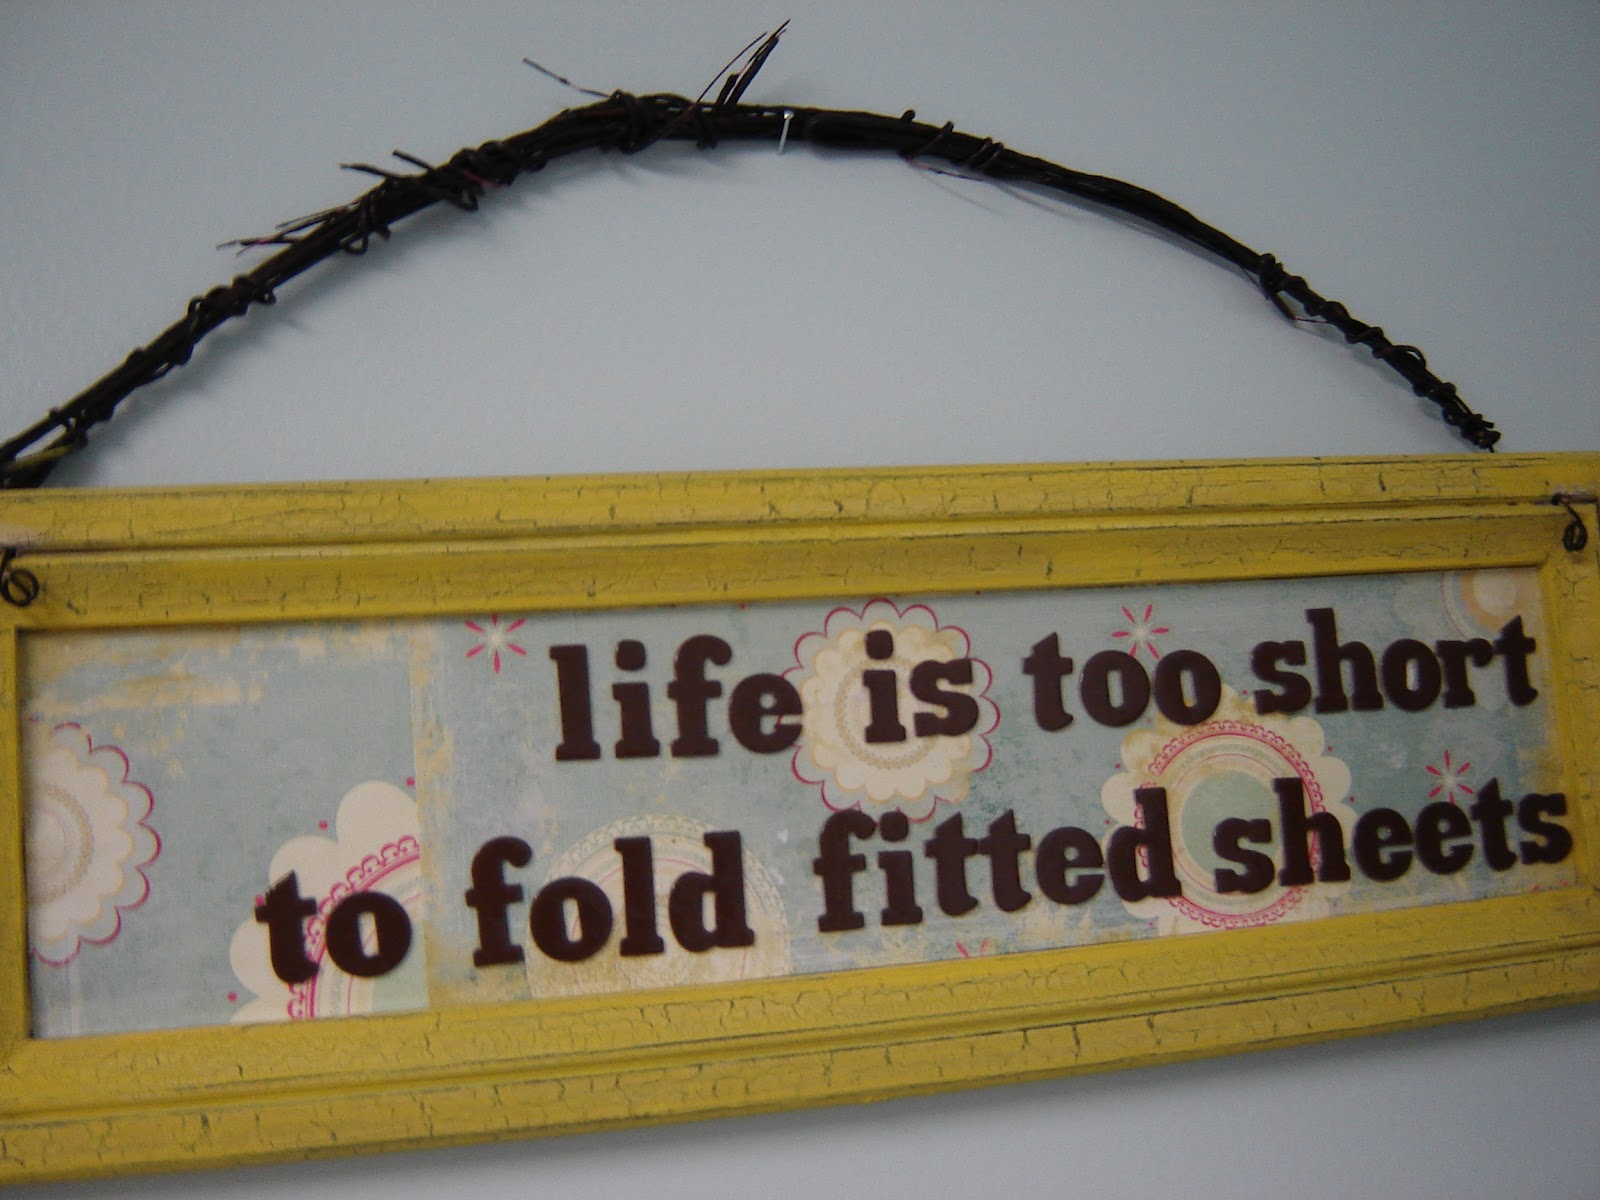
I liked the crackled look of it and its cheap price tag, but that's about it.  I decided to upcycle it for my laundry room by doing something similar to this sign that I saw on Pinterest once.  I painted it with yellow acrylic paint, then Mod Podged some scrapbook paper on top of that.  After that I used some chipboard letter stickers I found on clearance at Hobby Lobby to spell out one of the truest statements that will ever be uttered in a laundry room.


And I truly believe it.  I am 30 years old and I have a Masters degree, and I still cannot for the life of me fold one of those things.  I've even watched instructional videos on YouTube and I still can't grasp it.  I do a decent job with my son's crib sheets, but our queen-sized ones are almost impossible.  I kind of just wing it and hope for the best.  But I digress.

I like the quirky look of my sign, and it doesn't bother me too much that some of the letters are a little lopsided.  It's got character, and that's all I ask for.  It really pulls this corner of my laundry room together.


Total cost:  Around $4 for the letter stickers.  I had to get two packs to ensure I'd have enough letters to complete the project.  Every thing else I had on hand.  Yay!

So now I think the only other thing I really want for this room is a new ironing board cover.  Haven't found anything I like yet.  I might make one but I'm not sure I want to so we'll see!

Linked up to Creations by Kara!

5.25.2012

goodwill finds

Today I went to Goodwill and came across a major score.


How awesome is this vintage globe???  I've seen older globes used as home decor on Pinterest and magazines, and I really like the look.  Now I have one of my own for the low price of five bucks.  I can't find a date on it anywhere, but at least a couple of places on it give me a clue.


Yep, that's the USSR.


And yep, that's Burma.  So of course this globe isn't really educational (other than for history!), but I still think it's a cool find.  Not to mention it's in fantastic shape; no scratches or dents anywhere.  Right now it's sitting on top of my china cabinet in the dining room.


If we ever have a special room just for homeschooling, the globe might be cute to put in there too.  Again, pretty much just for decorative purposes.  :o)

I also finally knocked out a spray paint project I've been meaning to do.  One thing you can almost always find at thrift stores are brass candlesticks.  I found this pair for a few bucks awhile back.


And no, brass is not my thing.  But I liked the shape of these.  So I got a bottle of spray paint in "Ivy Leaf" and gave them a couple of coats.  I wanted a nice distressed look (not a glossy, plastic-y look), so I didn't bother using primer first.  Well, that, and I didn't even have primer at the house!  I gave them awhile to dry and here they are.


I looooooove them.  You can see little imperfections on them, where maybe the paint didn't get in a groove or maybe a slight stain on the brass showed through, but that's the way I like things.  I want to find more of these candlesticks in different heights and do different colors for every season!  For now these lovely green ones will do fine.  :o)


5.16.2012

vintage-inspired tray


So I'm still pretty tired most of the time; it's discouraging, but my husband reminded me last night that my body has been through a lot during the last six months, so maybe it's still just doing its best to recover!  Despite this, I've been able to tackle a few projects as my energy permits.  One of these is a really cute vintage-inspired tray.

I found this "beauty" at Goodwill last fall.  Gorgeous, right???


It's okay, you don't have to say it's gorgeous.  Total sarcasm over here.  But it was only a couple of bucks and I saw some potential, tacky decoupaged flowers and all.

A couple of months ago, I spray-painted it red, and then promptly lost interest.


Probably because I wasn't sure where to go from there.  Then pretty soon after I found some really cute cardstock on clearance at Jo-Ann and got inspired.  Unfortunately I was fresh out of Mod Podge.  So yeah, this thing sat in my hallway closet for awhile, and I came across it yesterday and thought, "Hey, I have Mod Podge now.  Let's finish this thing.  So I did!


I kind of like it.  It was awkward trying to Mod Podge that piece of cardstock down because the sides of the tray/frame/whatever it is are kind of high, so there are a couple of air bubbles.  But I think it just adds to the charm.


Not sure what I'm going to do with it yet.  It doesn't fit above my cabinets so I can't display it that way.  For now I might just prop it up on the kitchen counter.  One day I want to get a couple of small shelves for the kitchen wall for stuff like this and that way I can get some counter space back.  :o)

Unrelated note.  I've also been on a cleaning/organization kick.  My house was seriously neglected for over a month.  I did laundry and the dishes, that's about it.  And even then my husband had to help out a lot.  So the past week and a half has involved me undoing the damage, so to speak.  But it led to a pretty decent looking pantry.


As well as a pretty decent looking guest bathroom closet.


And yes, that's the best picture I could get of it.  If you've been in our guest bathroom you know how small it is.  I'm just glad I finally corralled all our first aid/medicine supplies, as well as our bathroom cleaning supplies.  And I used containers I already had.  Score.

And finally, a revamped fireplace mantel.  Since the frames don't match, I'm going to say it's "rustic eclectic" style.


Looks better in person.  This was actually inspired by me having to move a couple of the sharper-edged frames up to the mantel.  Yesterday my son was throwing himself all over our couch and ended up half-falling over the arm of the couch onto the end table.  Doing so caused him to cut his forehead on a picture frame.  Yikes.  I knew it was scary because my husband said "Wow, are you okay??"  Usually he just says "Aww, you're okay."  I was so relieved that it was just a surface cut (didn't even bleed), and that it missed his eye.  Thank You LORD!  This boy makes me so nervous but I know he must have a few angels standing by just for when he horses around and hurts himself!

So my next big project is our guest room.  It's basically where stuff we don't want or don't know what to do with goes to die.  During my last two pregnancies, I was actually excited about cleaning it out since the new baby would need the nursery and my son could move into our guest room.  I planned out his "big boy room" in my head and played around with different furniture layouts.  Of course when our babies didn't make it, I lost all motivation.  But I think I'm going to clean it out anyway.  Even if it remains our guest room/office for the next year even, I think it will do me a world of good to "prepare for rain," so to speak.  If anything it'll make me feel better to get rid of the clutter!

Wow, long post.  Thanks for reading!!  :o)

Linked up to DIY Under $5 at A Little Tipsy!

2.05.2012

master bedroom reveal!

We recently painted our master bedroom and I couldn't be happier with the results.  The pictures really don't do it justice but I'll share anyway!

Before:
After:
Before:
After:
Before:
After:
Before:
After:

I think the green really pulls everything together, and also complements our dark furniture and all the brown accents much better than the white walls did.  In case you're wondering, the name of the paint is "Blanched Thyme" from Valspar.  We also touched up the baseboards, windows, and door frames with "Winter Dawn" from Valspar.

When you paint walls yourself, it's easier to tell where the little mistakes are...a little drip there, a smudge there.  But once we moved the furniture back and hung things back on the walls, I don't notice those anymore.  It was also a great project to do with my husband; we don't always enjoy the same stuff so it's difficult to find things to do together.  Home improvement projects are definitely a good way to spend some time together!  Hopefully our new and improved bedroom will inspire us to fix up another room soon!

1.18.2012

magazine holder facelift


I decided my living room needed a designated spot to put some of my magazines.  A few well-placed polka dots couldn't hurt either.  So this is what I came up with.  Want to see how I did it?  :o)

About a month ago, I found a very sturdy wooden box at Goodwill that I assumed would be good for holding magazines.


I liked the rustic look of it, but not so much the fruit on the front.  So I decided to spray-paint the whole outside of it a pretty dark turquoise color called "Lagoon" that I had on hand.  It ended up being kind of bright, so I painted over it with some sage green acrylic paint, and then wiped a little off with an old rag as I went.  That way it wouldn't just be one flat boring color. 

As for the inside, I found a couple of sheets of cute polka dotted scrapbook paper in my stash.  I cut them to size and mod-podged them to most of the inside surfaces, and followed it up with another coat of mod podge to really seal it in.  There are a few wrinkles but luckily they're pretty hard to notice unless you're looking for them.  I left the bottom of the inside as it was since a) you can't see the bottom unless you really peek inside, and even then it's still a nice wooden surface, and b) because I didn't have any of the cute paper left and didn't want to use anything different in case it clashed.  I like it just the way it is.


I debated about putting something on the front, but I think for now the polka dots and the colorful covers of the magazines are enough visual appeal.


At this angle it looks like it's lopsided.  But it's not.  :o) 
Not bad for under $5.  The magazine holder was around $3, and everything else I had on hand. 

Linking up to Creations by Kara and A Little Tipsy!

1.13.2012

"hi" and "bye" doormat


Today I felt like doing a really quick, instant gratification project.  Didn't feel like dragging out the sewing machine either.  So I went and looked at all my bookmarked projects ideas on Pinterest and then came across this awesome doormat idea.  Perfect.  I decided to give it a try with one of our old doormats first.  That way if I messed it up it would only be a few bucks lost to replace the doormat (which I was probably going to do soon anyway...check out the raggedy corners on this thing).

I don't have a Silhouette or other craft cutting machine, so making my own stencils for the letters was out.  Then I remembered a set of foam letter stamps I found on clearance at Hobby Lobby back when I was still pregnant with my son. Yep, over two years ago, and these babies were still in the package.  Time to break them out.

The process was as easy as you're thinking....brush a little yellow acrylic paint on the foam stamps and then press onto the mat.  That was it.  Ta-DA!


I like the idea of being greeted right when you walk in the door.  Not that I won't personally greet you myself, but you know what I mean.  :o)

Now, since I was using a stamp rather than painting in a stencil, I would recommend not using a doormat that's really fibrous or anything.  With a stamp, it's basically a one-time shot and then you're stuck with what you've got, so at least with this bamboo mat the paint really stuck to it and didn't soak all the way in, so that one time was just enough.  With a really fluffy mat, one coat of acrylic probably wouldn't show up, so unless you're a great artist and can go fill in everything with a little paintbrush and more paint, I wouldn't suggest it.

Total cost of the project:  Zero dollars since everything was on hand.  The stamps were only around 3 bucks so even if I had bought them specifically for this project, that's still an incredible deal.  Not to mention it took less than five minutes.  Now for a cup of coffee before the little man wakes up from his nap.  :o)

 Linking up to Creations by Kara and A Little Tipsy!

12.05.2011

christmas crafts: cheap homemade ornaments

So last week I stocked up on some cute Christmas tree ornaments at Michael's since they were all 50% off.  That meant most of them ran me around 2 or 3 bucks each.  Not bad!  I wanted to get some that weren't breakable in case they fell off the tree or my toddler disobeyed a direct order and touched the tree...that and after being married for four Christmases, my husband and I still don't really have any ornaments to call our own.  I'm thinking I care more about this than he does.  :o)

Anyway, I really liked all of the ornaments I got but there were some gaps in our tree and I didn't know if I could get back there any time soon to get more ornaments, so I made some of my own instead.

All of the store-bought ornaments I found are vintage-ish looking, with burlap or bronze looking accents.  So I wanted to make some that coordinated with that.  I noticed my leftover cinnamon sticks from this project fit the bill, so I tied three of them together with Christmas ribbon I had one hand and then ran an ornament hook through the back.  I liked it so much I got another bag of cinnamon sticks from Hobby Lobby to make more.  While I was there I saw some painted jingle bells that also looked cute, so I got three packages of six and tied them together with twine.


The packages of cinnamon sticks and jingle bells were $1 each on sale at Hobby Lobby, so I ended up getting eight cinnamon stick ornaments for $1 and six jingle bell ornaments for $3.  Love it.  I also made an inexpensive tree topper out of a cardboard ornament; I painted it with acrylic paint I already had on hand so this one cost less than a dollar.  I'm not a fan of big, gaudy angels or other stuff on top of trees, so this looked better to me.


Here's our Christmas tree!  I really like all the ornaments on it and am looking forward to using them for years to come.  :o)

8.23.2011

cheap framed monogram


Okay, I know it's been a few weeks since my last post.  Life does seem to get in the way sometimes, but hopefully this will make up for my absence!

For over a year, Hobby Lobby had some pretty metal letters hanging up that I loved, but the price tag wasn't as good.  Even with a 40% off coupon, they seemed overpriced to me.  Sometime this year these letters were moved to clearance, but I never really noticed an "I" being among them since there was SO much other stuff in those aisles.

Then a few weeks ago, I spotted one of these letters.  And it just happens to be the first letter of our last name.


What?!  This was in clearance the whole time and I never saw it?  I was happy to see it wasn't too scratched up from being moved around so much.  The best part was the price though.


Yep.  $1.20.  And since that was like the sixth or seventh clearance sticker on there, it seems that it was a good thing that I didn't see it before now.  The original clearance sticker said this:


I think we're looking at $8.50 here.  As the original "clearance" price.  Craziness.  Under two bucks is much more my speed, and it was just so gratifying to hand the clerk two dollars rather than swiping the debit card!

Anyway, I thought the letter looked a little plain on its own, but I didn't want to spray-paint it or anything since I really liked the look of the metal.  So I pulled a large frame out my stash and spray-painted that instead.  I figured hanging the frame around the initial would make it pop a little.  I'm so glad I had this "Lagoon" color leftover from my keyholder.  LOVE IT.


So the total for this project: $1.20 plus tax, since I already had the spray paint and the frame was free from my mom.  Not too shabby.

I'm thinking I'll hang it in my mudroom since that lagoon color matches other stuff in there.  There's still a big blank wall to the right as you walk in, so I might try to do a frame collage there, with this monogram being in the center.  I'm certainly not at a loss for frames right now, it's just a matter of spray-painting them to match and figuring out a layout!  Stay tuned.  :o)

Linking up with Creations by Kara and A Little Tipsy!
Related Posts Plugin for WordPress, Blogger...