2.27.2012

a little of this, a little of that

Here's a mishmash of little projects from the past several days:


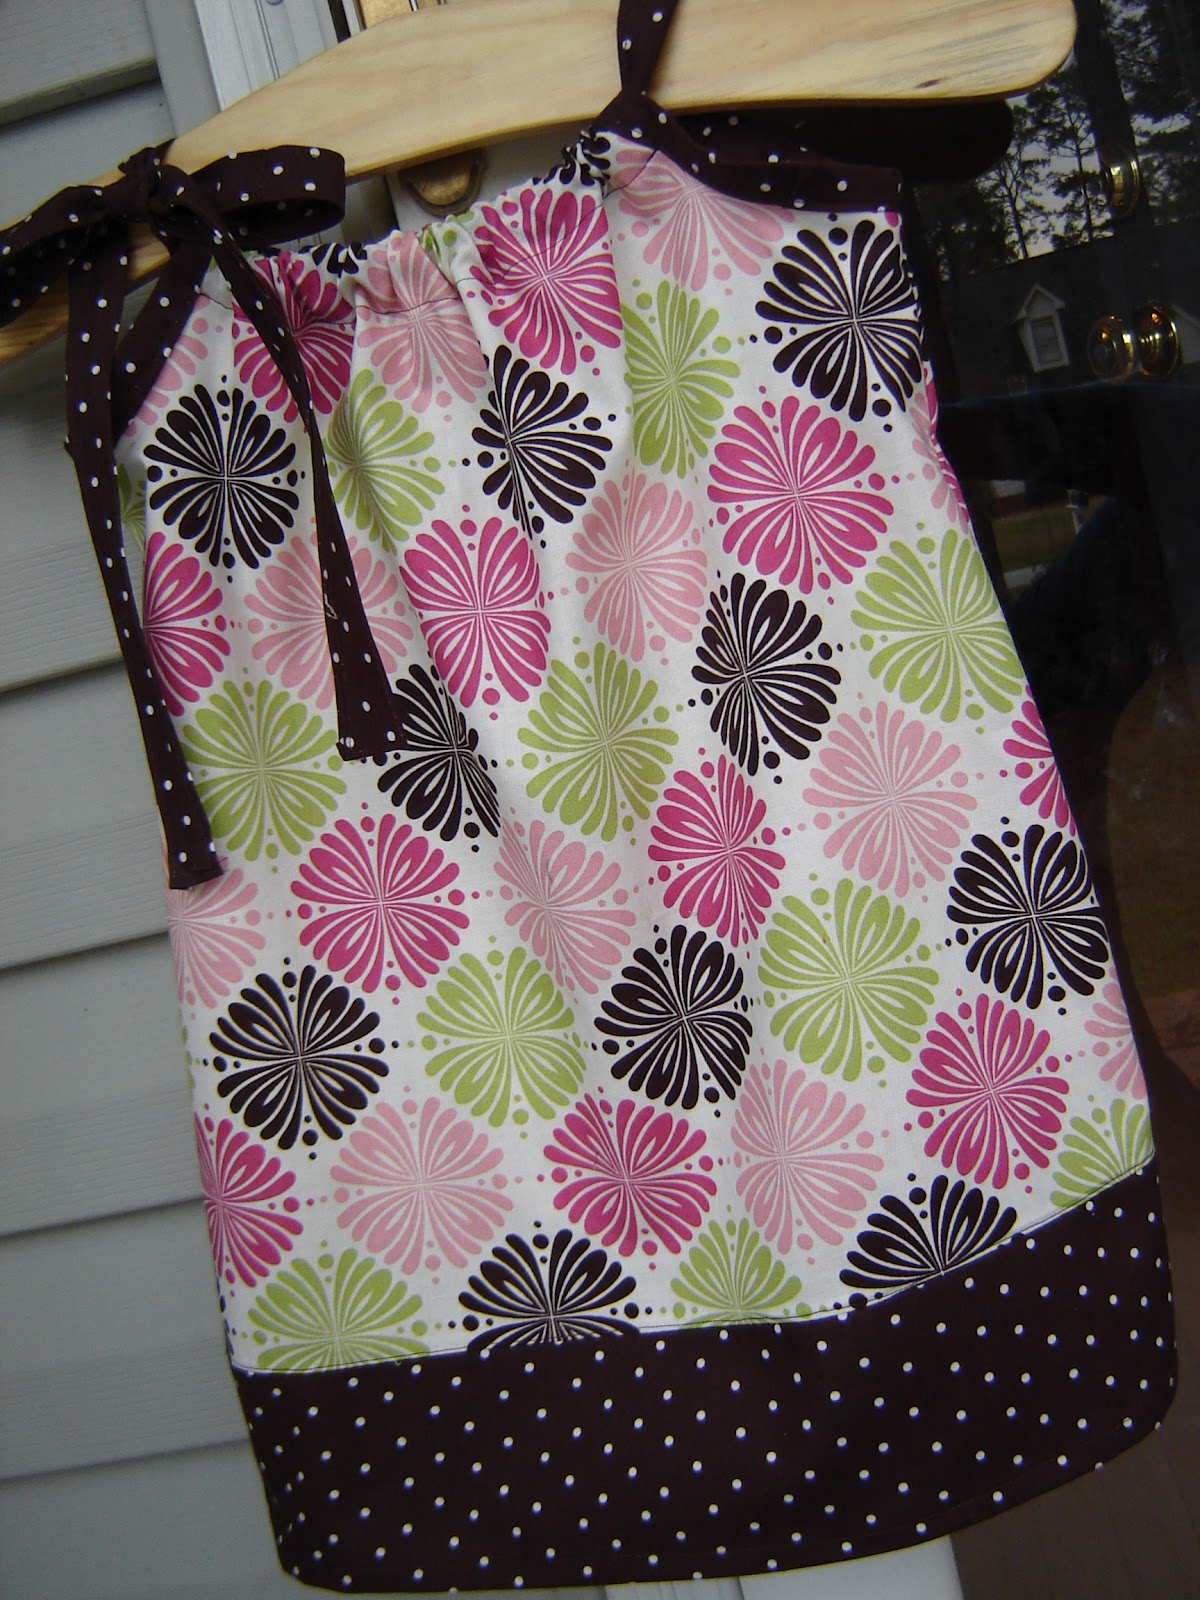
A pair of pillowcase dresses for a pair of cute sisters.  :o)


A pair of bracelets for my Etsy shop inventory.


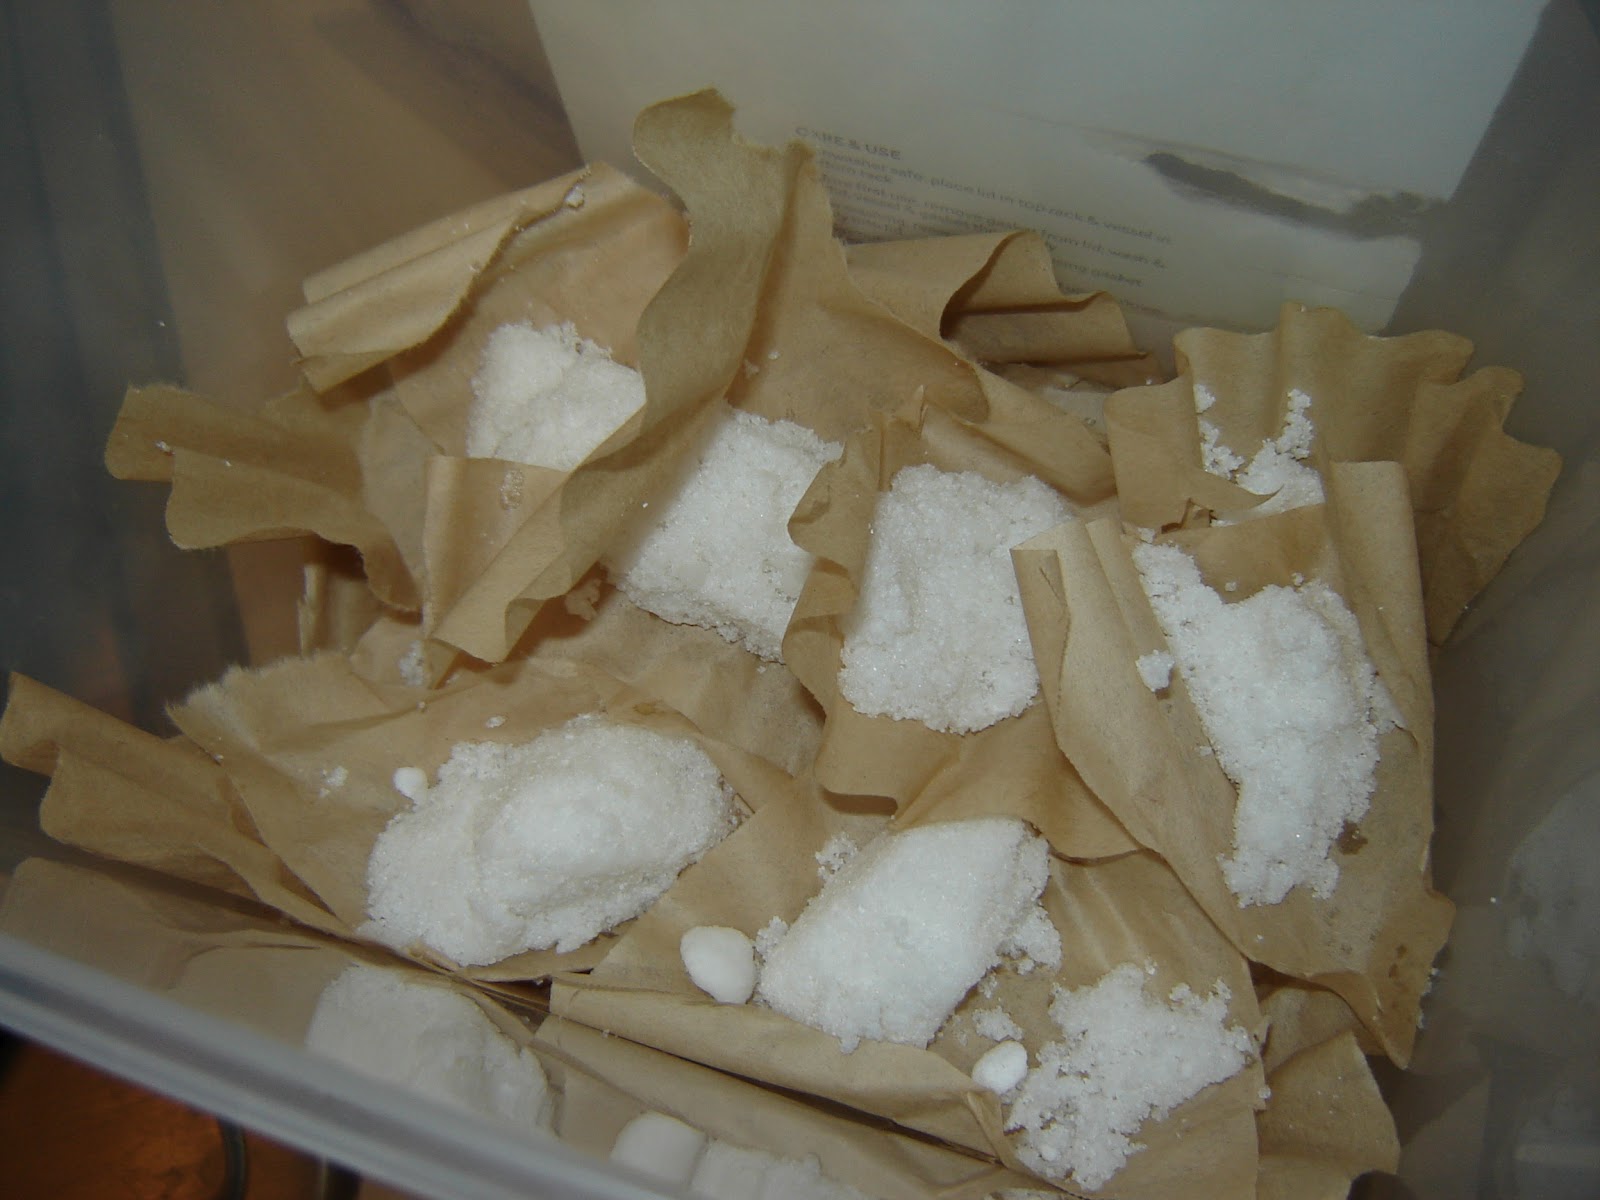
And last but not least, DIY dish detergent packets. I know, random, right?

I got the recipe and instructions from this blog.  I'd been using homemade dish detergent for about a month now, and while I was pretty satisfied with the results, I hated how much it clumped.  No matter what I tried, the citric acid made the mixture so hard it was difficult to scoop out.  But citric acid is a must if you have hard water like I do, so I decided that if the detergent was going to clump, I might as well make a batch and form it into individual packets.  Turns out it's not that much more work...you just spritz the mixture with water until it resembles damp sand, and then mold it into tablespoon-sized portions.  I used cut-up coffee filters to lay the mounds on, and after they dried for an hour or so, they were ready to go in the container.  The ones on top ended up kind of messy, but they still hardened very well.

So how do I feel about homemade dish detergent?  I'm still on the fence.  I feel like in some ways, it cleans better than the store-bought stuff I used to get (adding white vinegar to the rinse aid dispenser has also helped tremendously).  But with my plastic items (especially the valves to my son's sippy cups), I've noticed they don't get as clean.  However, I'm thinking the hot water in the dishwasher should sanitize everything well enough, which is really what I'm concerned about.  So I'll keep using this homemade stuff till it runs out, then I'll make the decision about whether or not to keep at it.  :o)

2.24.2012

for the love of turquoise


Recently I bought some blue and turquoise beads in order to make a bracelet for a friend.  I was loving the colors so much I ended up getting extras (good thing they were 50% off that week!).

What do you think?  The bracelet at the top is for my friend, the one in the middle is available for purchase in my Etsy store, and the one on the bottom I might save for a boutique auction on Facebook.  If I don't get tempted to keep them for myself.  :o)

2.23.2012

four-leaf clover pillow cover


I'm not a huge St. Patrick's Day person, though I will begrudgingly wear green on that day, if only to avoid the annoying pinching.  However, I've had this design for a pillow cover in my head for awhile now, so today I finally tried it out.


I used canvas fabric for the body of the pillow cover, and then this pretty green floral fabric for the applique.  Then it was just a matter of sewing everything up.  I'm always nervous about making mistakes when measuring, so I tested the cover by stuffing it with a pillow.


Whew.  It works.  :o)  This is a 14 x 14 pillow cover, and it's currently for sale in my Etsy shop (check out the widget to the left for the link).

You know, I'm kind of liking this clover stuff.  And who doesn't love the color green?  Makes me wish for spring that much more.  Maybe I'll make some more stuff like this.  Who knows.  Thanks for reading!  :o)

Linked up to Creations by Kara and A Little Tipsy!

2.22.2012

organize it! {bedroom closet}

Let me explain my recent absence from blogland lately....I caught some kind of virus a couple of weeks ago and it's still hanging on.  Basically a scratchy throat with lots of coughing, especially at night.  Not very conducive to creativity, I must say.  However, I'm feeling about 80% better this week, so I've actually gotten started on a few sewing projects.  More on that in a day or two.

One thing I've been doing is cleaning/organizing like crazy.  Not sure why.  I didn't make any New Year's resolutions to do so, it's too early for "spring cleaning," and I'm not pregnant so it can't be nesting.  Maybe I've been on Pinterest too much and have seen too many OCD-inspired closets and pantries.  :o)  Anyway, last week I finally tackled my bedroom closet:


Not the worst mess I've ever had in this house, but it was starting to bug me.  Fortunately our master bedroom has "his" and "hers" closets so I can keep my mess separate from my husband's mess!  I had a tower of jeans about to fall off that top shelf, baskets overflowing with purses and scarves, and a bunch of dresses and skirts I was hoarding "just in case" I can ever squeeze back into a size 5 or 6. 


I also had a bunch of shirts that ended up kind of short on me after I had my son.  Why is that?  Does pregnancy make your torso stretch or something?  So there they all were, along with that humongous garment bag (that had to stay no matter what....it houses my wedding dress and it won't fit in any other closet!).


And my shoe rack was a mess too....I blame my toddler.  That and the fact that half of those flip flops were old and nasty and just needed to be trashed. :o)


So anyway, after a lot of sorting and purging, here's what I have now.


Not bad.  I mean, you can actually see the floor!! 

I filled up a huge bag of clothes and shoes to give to Goodwill, and some of the nicer stuff (like dresses I only wore a few times before I got pregnant) I'm attempting to sell on Craigslist. 


I freed up so much space I was able to hang my scarves and some of my purses up so they're more visible (I found that hanger with all the hooks in my husband's closet.  He didn't appear to be using it so I thought why not?).  The pretty baskets on the shelf now contain that stack of jeans, and some belts and hats I don't wear that often.  One thing that still bugs me is my current storage system for maternity clothes and "wow I'm really fat because I just had a baby and breastfeeding did NOTHING to change that" clothes:


As you can see, those bags are stuffed to capacity, but I don't want to sort or purge anything from these collections just yet.  I might look into under-the-bed storage stuff or maybe those space bags where you use a vacuum to suck all the air out and make it all compact.  Do those actually work?

Hope you weren't bored to tears...maybe this post will inspire you to do some organizing of your own.  :o)

2.10.2012

pillowcase dress


One of my friends asked me if I could make pillowcase dresses for her girls, so I decided to make a "practice" one to work out any issues since I had never made one before.

Turns out it's pretty easy...the main "issues" I had were with my machine, like thread getting tangled up and stuff.  That and it takes some practice figuring out the length of the dress when you need to make a certain size; luckily it's easy to lengthen or shorten it when you're piecing it together.


The colors came out dark in these photos since I took them on an overcast day, so the black in these photos is actually more of a dark brown.


I opted to do a fabric tie instead of ribbon, and I'm glad I did since it really pulls everything together.


And I totally sewed one of these beauties in.  Couldn't help myself.


This dress turned out to be a 2T.  Maybe I'll try to sell it in my Etsy shop?  :o)

Linked up to Creations by Kara!

2.09.2012

embellished dollar store dishtowel


A long time ago I picked up a couple of yellow dishtowels from the dollar store.  I liked their bright color (as well as their price tag), and today I finally got around to making them a bit more interesting.


I had some cute chicken fabric leftover from some placemats I made for my mom last Mother's Day:


So all I did was cut out a couple of strips, fold down the long ends to make a hem, and then sewed them on the towels.  Simple and quick (but it would have been even quicker if my thread didn't get tangled up in my sewing machine for the umpteenth time...that machine might need a tune-up!).


They add great personality to my kitchen, for just $1 each.


I might add some cute red ric-rac to them as well, haven't decided yet.  For now I really like them the way they are (wrinkles and all....can you tell these towels hung out in my closet for almost a year??).


Depending on how well these do in the wash, I might make a couple more sets!  :o)

Linked up to Creations by Kara and A Little Tipsy!

2.06.2012

guest post

Today I'm guest posting over at Hidden Treasures on the subject of miscarriage.  The blog's author, Angela, felt led to do a series on this painful yet faith-strengthening experience, and in turn I felt led to share my story.  Even if you haven't been through a miscarriage, this series would be a helpful read if only to better understand how to help those who have.  Either way you may want to keep the Kleenex handy.  God Bless!  :o)

2.05.2012

master bedroom reveal!

We recently painted our master bedroom and I couldn't be happier with the results.  The pictures really don't do it justice but I'll share anyway!

Before:
After:
Before:
After:
Before:
After:
Before:
After:

I think the green really pulls everything together, and also complements our dark furniture and all the brown accents much better than the white walls did.  In case you're wondering, the name of the paint is "Blanched Thyme" from Valspar.  We also touched up the baseboards, windows, and door frames with "Winter Dawn" from Valspar.

When you paint walls yourself, it's easier to tell where the little mistakes are...a little drip there, a smudge there.  But once we moved the furniture back and hung things back on the walls, I don't notice those anymore.  It was also a great project to do with my husband; we don't always enjoy the same stuff so it's difficult to find things to do together.  Home improvement projects are definitely a good way to spend some time together!  Hopefully our new and improved bedroom will inspire us to fix up another room soon!

2.04.2012

burlap earrings holder


I think I'm in love with this project.  Especially because it was essentially FREE.  I got the inspiration from a blog called Positively Splendid.  :o)

I started with a pretty framed mirror I found at Hobby Lobby over a year ago.  It hung above my dresser for awhile, but once we repainted that room I wanted something different.  I loved the look of the frame, but didn't really need the mirror part.  So I decided to make an earring holder out of it instead.


I removed the mirror and the backing (which involved loosening some very tiny screws, by the way), and then found some scrap burlap leftover from that Christmas tree skirt I made.  Taking the advice from the original tutorial, I cut the burlap a little bigger than the frame's opening and then ironed it with spray starch till it was nice and stiff.


Then I used my staple gun to carefully attach the burlap to the back of the frame, pulling tight as I went.  I was thankful that it had a wooden backing despite being a metal frame; otherwise I probably would have had to use hot glue instead.


Once I had it down nice and tight, I trimmed off the excess and that was that.


I decided not to add anything else since the frame's on the small side and is already pretty embellished on its own.  And since it coordinates wonderfully with other items in our master bedroom, I think I'll return it to the spot above my dresser; it'll hang right next to my other jewelry organizer so it makes sense.

The burlap is nice and stiff for holding earrings, and it's the perfect size for me since I don't wear that many dangly ones.  I do have a few more than just the two pictured, but that's about it.  Maybe now that they'll be hanging right in front of my face when I get ready in the morning, I'll be more likely to wear them.  :o)


Total cost:  Zero dollars. :o)

So what do you think??


Linked up to Creations by Kara and A Little Tipsy!

2.03.2012

memo board


Before you get too impressed and think I did this project "from scratch," let me clue you in on just how easy this was.  I started with an old French memo board I've had since college.


I've used it for years to hold appointment reminders, important notes, and pictures.  While I liked the function of it, I was getting tired of the flowers.  So yesterday I took the plunge and started taking it apart.  Turns out it was fairly easy; there was a very thin layer of batting-like material glued to the back that I just gently ripped off while keeping it in one piece (just in case).  Then it was just a matter of cutting the ribbons and prying out the tacks.  I kept the original fabric on there because I was going to cover it up anyway.  Which I did with some fabric I already had on hand.


Yeah I used a staple gun.  For the first time EVER.  It was exciting, nerve-wracking, and strangely satisfying all at the same time.  It helped to know that no one would ever see the back so I could be as liberal with the staples as I wanted to be.


Already looking better.  I had to wait at this point because I wanted brown ribbon but didn't have any.  A quick trip to Hobby Lobby this morning fixed that (and it was 50% off too!).  Stapling the ribbon on there was pretty easy; I used a picture of the original board plus the indentations that were still in there to figure out where to place everything.


For the tacks, I used some simple upholstery tacks leftover from this project.  The one in the center was the toughest to hammer in because there was skinny piece of wood glued to the back.  So it's a tiny bit lopsided but it's not immediately noticeable.  The other ones went in very easily with some taps with the hammer, but the sharp ends were poking out of the back.  So I brought out my hot glue gun and simply glued the ends in place, then encased the points in more globs on hot glue.  Not the neatest looking thing ever, but it works.


After that I hot glued and stapled the original backing fabric back on (I used both because I was on my last glue stick and the glue gun was literally running on fumes, so I attached a few staples to make sure everything would stay).


And there you have it!


I like this version better.  If I had known it would be this easy and inexpensive I would have done it a long time ago!  Total cost:  $1.00 for the ribbon; everything else on hand.  :o)


Linked up to Creations by Kara and A Little Tipsy!
Related Posts Plugin for WordPress, Blogger...