I made my first window treatment last night, and I'm actually sad that this is the best picture I could get of it with our camera. I tried all kinds of settings, with and without flash, and this is it. Sigh. Looks a lot better in person!
When my parents visited a few weeks ago, my mom gave me a quick crash course on making a window panel for the door leading to our garage, since she knew I
Yuck.
So I found some cute paisley fabric at Jo-Ann for 30% off and got to it. Since the window on the door isn't that wide, I figured that the natural width of the fabric (selvage to selvage) would be enough to go across the rod (my mom recommended taking the horizontal length of your window and adding at least 50% of that for the overall curtain length, and then going by the actual yardage for the vertical length, if that makes any sense). I trimmed up the other sides to get rid of the raggedy edges, since I had pre-washed this fabric and that always makes it fray a bunch.
My mom had told me to hem the sides first, since that would make finishing off the top and bottom of the curtain easier later on. I folded one side about a quarter of an inch, pressed it with an iron to make it hold, and then folded it another half of an inch and pinned it down.
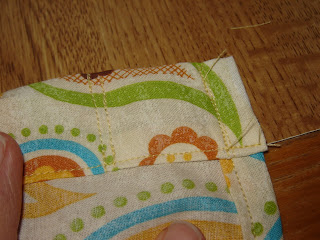
I sewed all the way down the side, then did the same to the other side. Then I went on to the top. I folded the top down a half of an inch and pressed it:
Then I folded it another inch or so and pinned it down all the way across. This created a pocket for the curtain rod to go in.
I made sure the pocket was wide enough to accommodate the rod, then sewed across. I then sewed another line about a half an inch from the top, since I realized the pocket was too big and this way there would be a little ruffle at the top of the curtain (you'll see that later on).
Then I hemmed the bottom. I folded and pressed a quarter of an inch as I had done with the other sides, and then folded it over enough to fit a nickel inside. This will help weigh the curtain down so it'll hang straight and not blow around so easily. I figured since this curtain would be going on a door that would be an important thing to add (unless it's a good thing for your handmade curtain to get slammed in the door..).
I pinned this fold all the way across, and then sewed it down. Then I went back to add the nickels. I slid one in there:
And then made a vertical seam on each side to hold it in. I did the same on the other end.
I just did a nickel at each end, but looking back it might have been good to weigh the curtain down in the middle as well. But it works either way.
Next I sewed a ribbon near the bottom because I felt like it still needed something.
And then I hung that pretty thing up!
See the little ruffle on top? I guess accidentally making the rod pocket too big turned out to be a good thing. The curtain looks a tad short in this picture, but then again, it doesn't get in the way when you reach for the doorknob. And it allows for privacy, yet lets sunlight in. I opted not to line the curtain since our garage prevents direct sunlight from hitting the door; if this hadn't been the case, I probably would have lined it to prevent fading.
Not bad for my first attempt! I also got some fabric to make a valance for our master bath. I'm thinking that project will go even quicker now that I have a better idea of what the heck I'm doing. :o)
Linking up to Creations by Kara again this week....go check it out! There's so many good ideas on there already! :o)


Super cute! You make me want to get in there and do some sewing! Thanks for the inspiration! :)
ReplyDelete