1.30.2012

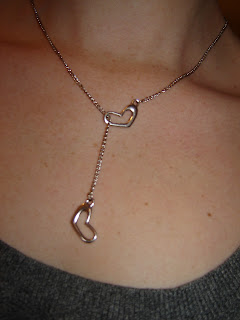
"two of hearts" necklace

The other day I found a couple of heart charms at Hobby Lobby...they're really supposed to be part of a toggle clasp for bracelets, but I had another purpose for them.  You know those really cool necklaces that "fasten" in the front by interlocking the two ends with  pretty charms?  Turns out they're called "lariat" style necklaces, and after playing around with several inches of chain and a couple of jump rings, I think I figured it out.


{Sorry you have to see my freckles.  I really need to find a better model for my jewelry.  I'll let you know how that goes....}

I really like it.  I'll have to be on the lookout for other kinds of charms to use for this kind of thing.  In the meantime, if this doesn't sell on my facebook page I'm probably keeping it for myself. :o)

1.27.2012

featured project!


Remember this magazine holder I fixed up?  Today it's a featured project on Roadkill Rescue!  If you've never checked out this site before, you should.  It's the ultimate trash-to-treasure headquarters.  Thanks for reading!  :o)

1.26.2012

dry-erase love-note message board


I saw this idea online recently and loved it.  I think it's technically supposed to be for your kids, but I don't see why it can't work for husbands and wives as well! 

My husband and I often leave handwritten messages on our bathroom mirror with a dry-erase marker.  I thought it would be a cool idea to have a dry-erase message board in there, complete with a prompt.  Kind of like romantic Mad Libs.

I took this frame off the wall and got rid of my attempt at scrapbook paper abstract art from a few years ago.  I also got rid of the white matte.


Then I just pieced some coordinating scrapbook papers together and used a blue-green sharpie to freehand the letters.  And you can probably tell I freehanded all the letters.  Oh well, that just makes it more special.


Our bathroom gets GREAT lighting, can you tell??
So now all we have to do is write on the glass with a dry erase marker.


And just think of all the ways we can finish this sentence, from encouraging words ("I love you because you work so hard for us") to jokes ("I love you because you remembered to put the toilet seat down")!  It also compels both of us to really think about WHY we love each other.


And if I ever get sick of the paper I used (or if it clashes with whatever paint color we choose for the walls once we spruce that bathroom up), it won't take me long at all to change the look.

Project cost:  Zero dollars and twenty minutes.  Hopefully it looks like it took an hour at least.  :o)

1.25.2012

sunburst bracelet


I've been experimenting more with jewelry-making lately.  This week I decided to take the plunge and go beyond my typical, single-stranded bracelet.  I found a beautiful red and silver charm at Hobby Lobby....on clearance for 88 cents!  I liked that it had the hook in the back and not on top.  So all I did was round up all of my red beads (along with some neutral colors that coordinated well) and created this triple-stranded beauty.


It's technically for sale through my Facebook page, but I might keep it for myself if no one snatches it up (so far I've gotten a few requests for different colors though!).

Total cost:  88 cents since I had the other beads and hardware on hand.

Before this I also tried a double-stranded bracelet with some brown beads:


It ended up longer than the bracelets I normally make, but I still love it.  This one was "free" because I had everything on hand too.  Now if I could just figure out how to make earrings I'd be all set.  :o)

Linked up to Creations by Kara and A Little Tipsy!

1.24.2012

diy faucet extender


***Warning:  Not-so-pretty quick fix up ahead.  Seriously.  In this case, function will definitely overrule attractiveness.  Okay, let's continue.

The other day I was reading a parenting magazine and happened to see an ad for a plastic extender you can put over your bathroom sink's faucet.  That way, the stream of water hits closer to the front of the sink so little hands can reach it better.  I thought this was the best idea, since even with his new stepstool, my son still can't get his hands underneath the water.  And currently washing his hands is one of his favorite things to do, so I wanted to keep it that way! 

I looked up the product online, but it was 12 or 13 bucks plus shipping.  And I actually considered purchasing it.  But I decided to let the idea marinate for awhile and search the web to see if there was a way to make it myself (one blog suggested using a jar opener and an old hair-tie!).

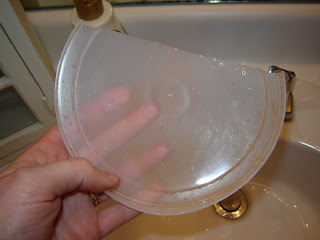
This afternoon, it dawned on me.  Use a plastic container lid!  The cheap, throw-away kind so it's nice and bendy.  And yes, bendy's a word.  Anyway, I grabbed an old lid (complete with spaghetti sauce stains...nice) and a thick rubber band and started playing around.


First, I trimmed the lid a bit since I knew it didn't need to be that big.


I actually trimmed it down a few more times until I got to a size that I was happy with.  I just kept wrapping it around the faucet and then turning the water on to see how it flowed.  The trick is to not put it that far back since that can make the water flow backwards, but also leave a slight tilt downward at the end so all the water can flow out and not get hung up in there.  In the end, I used a second rubber band to make sure it would stay on better.


Obviously we're not going for cuteness points here.  Being cheap isn't always pretty.  :o)


I think it works fine for now though.  It's not on there super-tight (a feature I probably would enjoy with the store-bought one!), but I figure that will just make it easier to remove when we have guests over, since the guest bathroom is where we brush my son's teeth and wash his hands.

So there you go.  Five minutes and zero cost.  At least I got that going for me.  :o)

Linked up to DIY Under $5 at A Little Tipsy!

1.21.2012

it's raining two's!


For a sweet little girl whose nickname is "rainbow."  This shirt design was the brainchild of her mom; once she described to me what she was thinking, I came up with this.  And when worn with a hairbow and a tutu made by a couple of other local talented ladies, this is going to be one cute two-year-old.

I apologize for the dark picture...wouldn't you know it, I took it on a cloudy, rainy day!  :o)

Linked up to Creations by Kara!

1.19.2012

in the kitchen: chai tea muffins


Here's a recipe I tried this afternoon to get rid of some extra tea bags.  I love chai lattes from Starbucks but can't come close to replicating them at home, so when I found this recipe for "chai breakfast cupcakes" I decided to give it a go.  I didn't add the icing (although it sounds delicious!) in an effort to be able to legitimately call these "muffins" instead of "cupcakes" (because it just makes me feel better about eating them!).  I also used a ripe avocado instead of butter because I wanted to use it before it went really bad.  I have GOT to start eating those things faster.  :o)


Chai Muffins
(adapted from Lady Behind the Curtain)

The Ingredients.
1 1/4 cups milk
4 chai tea bags
1/2 cup butter, softened
1 1/2 cups sugar
1/2 teaspoon vanilla
2 eggs
1 1/2 cups all-purpose flour
1/2 cup whole wheat flour
1 1/2 teaspoons baking powder
1/2 teaspoon baking soda
1/2 teaspoon ginger
1/4 teaspoon salt
3/4 cup granola (I used apple-blueberry because that's all I had on hand!)

The Method.
Preheat oven to 350 degrees.  Spray a couple of muffin tins with nonstick spray or else use baking liners (heads up...the yield for this recipe is 24 muffins.  Mine only made 18.  Not sure why.  No biggie though).  In a small saucepan, heat up the milk until it's just barely simmering (be careful not to scald it).  Remove from heat and add the tea bags; allow to steep for 5 minutes.  Remove tea bags, pressing them to release the liquid back into the saucepan.  Set aside.
In a bowl, stir together the flours, baking powder, baking soda, ginger, and salt.  Set aside.  In a separate bowl, beat the butter with a handheld mixer until fluffy.  Add the vanilla and sugar; beat until well-mixed.  Add the eggs one at a time, and mix well after each addition.  Alternately add the flour mixture and the milk-tea mixture to the beaten mixture (beat on low speed and do not overmix or else the muffins will be tough!).
Fill muffin cups two-thirds of the way full and sprinkle the tops with granola.  Bake for 15-20 minutes or until a toothpick inserted in the center of a muffin comes out clean.

Pretty yummy!  You can taste the tea but it's not overpowering at all.  I used vanilla chai tea because that's what I had, and that extra bit of vanilla really made it tasty.  Check out the original recipe at the link above if you want to make the yummy icing to drizzle on the top.  Maybe I'll do that next time.  :o)

1.18.2012

magazine holder facelift


I decided my living room needed a designated spot to put some of my magazines.  A few well-placed polka dots couldn't hurt either.  So this is what I came up with.  Want to see how I did it?  :o)

About a month ago, I found a very sturdy wooden box at Goodwill that I assumed would be good for holding magazines.


I liked the rustic look of it, but not so much the fruit on the front.  So I decided to spray-paint the whole outside of it a pretty dark turquoise color called "Lagoon" that I had on hand.  It ended up being kind of bright, so I painted over it with some sage green acrylic paint, and then wiped a little off with an old rag as I went.  That way it wouldn't just be one flat boring color. 

As for the inside, I found a couple of sheets of cute polka dotted scrapbook paper in my stash.  I cut them to size and mod-podged them to most of the inside surfaces, and followed it up with another coat of mod podge to really seal it in.  There are a few wrinkles but luckily they're pretty hard to notice unless you're looking for them.  I left the bottom of the inside as it was since a) you can't see the bottom unless you really peek inside, and even then it's still a nice wooden surface, and b) because I didn't have any of the cute paper left and didn't want to use anything different in case it clashed.  I like it just the way it is.


I debated about putting something on the front, but I think for now the polka dots and the colorful covers of the magazines are enough visual appeal.


At this angle it looks like it's lopsided.  But it's not.  :o) 
Not bad for under $5.  The magazine holder was around $3, and everything else I had on hand. 

Linking up to Creations by Kara and A Little Tipsy!

1.15.2012

in the kitchen: butternut squash and apple soup


This past week I've been going through the huge piles of recipes I've clipped from magazines for the past couple of years and have resolved to try at least two of them a week.  If they're winners, they'll get a spot in my huge recipes binder.  Here's one that made the cut!

It's from Cooking Light magazine, but it's certainly not lacking in yumminess.  It's also very easy to put together, especially if you take advantage of the pre-chopped veggies in the produce section; sure, you pay a little extra for the convenience, but have you ever actually cut into a huge butternut squash?  It's incredibly difficult to cut through that rind, and once you do, there's all those slippery seeds to deal with.  And chopping onions doesn't just make me cry...my eyes literally burn and my vision becomes really blurry until the job's done (and I'm thinking blurry vision + sharp knife = BAD IDEA).  :o)

I adapted it a little to include some chopped apple; I had seen that with another squash soup recipe and thought it sounded interesting.  Here's my adapted version!

Butternut Squash and Apple Soup
(adapted from Cooking Light)

The Ingredients.
1 tablespoon butter
3 1/2 cups cubed and peeled butternut squash (I used a 12-oz. bag of cubed squash from Walmart's produce section)
3/4 cup chopped carrot
1/2 cup chopped onion
1 cup chopped and peeled apple (I used Gala)
2 1/2 cups fat-free, less-sodium chicken broth
1/4 cup fat-free half-and-half
Salt and pepper to taste

The Method.
1.  Melt butter in a large saucepan or Dutch oven over medium-high heat.  Add the squash, carrot, onion, and apple; season with salt and pepper and saute for 12 minutes or until tender.  Add the chicken broth and bring to a boil.  Reduce heat, cover, and simmer for 20-30 minutes.
2.  Remove from heat and stir in half-and-half; add more seasoning if desired.  Puree in blender in batches until it reaches a smooth consistency (remove center piece of blender lid to let steam escape, and place a towel over the opening when blending to prevent splattering).  I used my immersion blender at this point.  Love that thing.

This soup yields four servings, but they're a bit on the smallish side so doubling the recipe might be a good idea (soup always freezes really well so that's always an option if you have leftovers).  The carrots and apples really accentuate the sweetness of the squash without being overpowering.  I think the only thing I might try next time is maybe add a bay leaf to the mix while it's simmering on the stove to add another level of flavor.  Perfectly delicious either way!  :o)

Linking up to Creations by Kara and A Little Tipsy!

1.13.2012

"hi" and "bye" doormat


Today I felt like doing a really quick, instant gratification project.  Didn't feel like dragging out the sewing machine either.  So I went and looked at all my bookmarked projects ideas on Pinterest and then came across this awesome doormat idea.  Perfect.  I decided to give it a try with one of our old doormats first.  That way if I messed it up it would only be a few bucks lost to replace the doormat (which I was probably going to do soon anyway...check out the raggedy corners on this thing).

I don't have a Silhouette or other craft cutting machine, so making my own stencils for the letters was out.  Then I remembered a set of foam letter stamps I found on clearance at Hobby Lobby back when I was still pregnant with my son. Yep, over two years ago, and these babies were still in the package.  Time to break them out.

The process was as easy as you're thinking....brush a little yellow acrylic paint on the foam stamps and then press onto the mat.  That was it.  Ta-DA!


I like the idea of being greeted right when you walk in the door.  Not that I won't personally greet you myself, but you know what I mean.  :o)

Now, since I was using a stamp rather than painting in a stencil, I would recommend not using a doormat that's really fibrous or anything.  With a stamp, it's basically a one-time shot and then you're stuck with what you've got, so at least with this bamboo mat the paint really stuck to it and didn't soak all the way in, so that one time was just enough.  With a really fluffy mat, one coat of acrylic probably wouldn't show up, so unless you're a great artist and can go fill in everything with a little paintbrush and more paint, I wouldn't suggest it.

Total cost of the project:  Zero dollars since everything was on hand.  The stamps were only around 3 bucks so even if I had bought them specifically for this project, that's still an incredible deal.  Not to mention it took less than five minutes.  Now for a cup of coffee before the little man wakes up from his nap.  :o)

 Linking up to Creations by Kara and A Little Tipsy!

1.11.2012

belated shower gift!

One of my oldest friends is about to have a baby boy in the next month or so.  And by "oldest" I just mean the amount of time we've known each other, not her actual age...haha!  She lives in Florida so I wasn't able to make her baby shower, so I sent her a belated gift a couple of days ago.


Isn't that plaid fabric absolutely crazy cute for a necktie onesie??  I thought so.  My friend saw the animal letter flannel on my facebook page and said she liked that the most, so I made her up a set of burpcloths to go along with the shirt.  She will quickly learn that with a baby, you can never have too many burpcloths!

I really hope she likes them....and that she gets them in the mail before she sees this post and I completely ruin the suprise...haha!  :o)

1.10.2012

use what you have!

I am a big believer in repurposing items in my house.  Often just moving items from one room to another can make all the difference and maybe even serve a much better function.

Case in point....a couple of years ago my grandmother gave us two short bookcases she wasn't using anymore.  They were the perfect size for a kid's room, but really only one could fit in Caleb's room because of the furniture layout.  So we stuck one in there and it now houses his growing book collection, and the other one took up residence in our master bedroom (if only to mask the fact that our current furniture does not adequately fill up all the space in there!).  I put some books on it, but it was always kind of an odd piece in the room, like it didn't really belong there.

Meanwhile my kid just had his second birthday, and his "playroom" (a.k.a. one of the corners of our living room) was getting out of control with toys, even though only about half of them stay out there at any given time.  (I'm also a big believer in switching out my kid's toys every week so our living room doesn't get taken over.)  Yesterday I rearranged all the bookcases in the house so that every book had a place on a shelf; this left that second bookcase in our room completely empty.  And even more odd-looking.

And then the ephiphany came.  I don't know why it took me this long to figure it out.  Presenting the new and improved "playroom."


I don't have a "before" picture, but just imagine all those toys, books, etc. being either stuffed into that single red storage bin or just stacked up beside it.  Now when it's time to clean up, there's more places to put everything and it won't be as cluttered.  My son does a great job with cleaning up but it always helps him to have an actual spot to put something.  And that box on top of the bookcase used to have three mini photo albums in it; it was so sturdy I didn't want to throw it away, so now it's a book and small toy caddy.  Maybe one day I'll cover the flowers up somehow.  :o)  Either way that part of our living room makes more sense now.


You may notice that the "not enough furniture to adequately fill the space" problem also exists in our living room.  For now, our cheap or free furniture works just great!

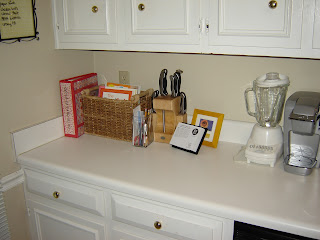
Now in the kitchen, I had an issue with cookbooks.  I recently got rid of some I wasn't using, but I still had a good dozen out on the counter, plus my huge recipe binder with all the recipes I've printed off the internet or clipped from magazines.  I also don't have a "before" picture of this, but just imagine a long line of cookbooks, spines facing out, and falling over whenever you go to take one out.  Oh, and also imagine pens flying everywhere.  We have a cute basket we got as a wedding gift that's the perfect size for a magazine holder, but I wasn't really using it for that.  It had been sitting in our guest room pretty much since we moved in to this house, and all it had in it were some old phone books.  I took it out of hiding and put maybe four or five of my cookbooks in it (basically the ones I use the most), and loved it.


I re-organized a cabinet in the kitchen to house the rest of the cookbooks to keep them out of sight when they weren't being used.  I found a ton of pens when I was moving all the cookbooks, and found a pretty rectangular vase leftover from one time my husband sent me flowers.  Perfect size for pens and a skinny pad of paper.


So now cluttered has become this.


And now that corner of the kitchen makes me less grumpy.


This little bit of organization also helps distract me from the fact that we still have white countertops and white cabinets.  Which show every speck of dirt or food and never look clean to me.  I'll stop myself there before I go on.  :o)

1.09.2012

goodwill trip

This morning I went to Goodwill just to look around, and scored some really neat old books.  I'm really excited about this one.


A Duncan Hines cookbook!  I like how it includes "the art of carving."  It's fun to see how different cookbooks used to be, with hardly any pictures and recipes like "Champs Elysees Potatoes, " "Aunt Delia's Piccallili," and "Old Fashioned Indian Pudding."  It even has a recipe for those jellied meat molds like in that movie Julie and Julia.  It has several copyrights listed in the front, and they range from 1939 to 1947, so either way this book is at least sixty years old.  Love it.  I think at some point I want to put some kind of shelf up in the kitchen to maybe display vintage stuff like this.

I also found some cute books for my son once he's older.


The "Straight Up" reader says that its copyright is 1944, and its illustrations are from 1967.  It has a bunch of stories about airplanes and helicopters, so it might be fun for Caleb to read when he's older.  The Curious George book is from 1963, and it's all about the alphabet.  These books don't look like they were read all that much by the previous owner since the pages are still in great condition and the covers aren't marked up.  Or else it was one careful kid taking care of them!  I know they belonged to someone because their name is stamped on the front page of both.  Either way I'm hoping I can teach my son to be as careful with his books as this person was!  :o)

1.07.2012

when life hands you an avocado...


So I have a goal for 2012....try NOT to waste food.  Produce is particular is a problem in our house.  I tend to overbuy, thinking we'll eat it all up before it wastes away in the fruit bowl or fridge.  But I often forget I'm the only person in the house who eats certain kinds of produce, so all too often I find a moldy zucchini or rotting kiwi that I had forgotten about.  So the last time I went to the grocery store, I made a conscious effort to only buy produce I knew for a fact would get eaten within the week (or less, since they say the more days that go by, the more nutrients your produce loses).

But I had a problem.  I had a very ripe avocado sitting on the counter this week.  I love avocados, but seldom buy them since they're so expensive.  Recently Publix had them for $1 each so I bought three, but the third somehow got forgotten.  I hated the thought of throwing it away, but it was really mushy so I'm sure it wouldn't look too appetizing inside. 

Something else happened this week.  I saw a recipe on Betty Crocker's website where they suggested substituting a very ripe avocado for the butter or oil while making muffins from a mix.  Hey, I had a very ripe avocado.  And I was sure I could try this when making muffins from scratch (which is what I normally do now).  My husband loves banana-chocolate-chip muffins, and they're a treat I make just for him since I don't like them, so I decided to give the great avocado switcharoo a go.

And they turned out great!  My husband didn't notice a difference in the taste at all (in fact, I didn't tell him what I had done so he wouldn't eat them with a biased opinion!).  I didn't take a photo of the muffins only because I was so distracted by my whiny toddler when I made them, I forgot to put baking powder in them!  So while they still tasted good to my husband, they were kinda flat and not very picture-worthy.  :o)

So here's the recipe I used:

Banana Chocolate-Chip Muffins
The Ingredients.
1 very ripe avocado
1 cup sugar
2 eggs
1 teaspoon vanilla
2 or 3 very ripe bananas
2 cups flour (I used 1 cup whole wheat and 1 cup all-purpose)
2 teaspoons baking powder
1 cup semi-sweet chocolate chips

The Method.
Preheat oven to 350 degrees.  Spray a 12-cup muffin pan or else use cupcake liners.  Remove avocado flesh and beat with an electric mixer until smooth.  Add the sugar, eggs, vanilla, and bananas and mix until smooth.  Add the flour and baking powder and combine with a wooden spoon until incorporated (don't overmix or the muffins will be tough; I usually don't use a mixer at this point or else I'll have flour flying everywhere!).  Stir in the chocolate chips.  Fill muffin cups 2/3 of the way and bake for 20 minutes or until golden brown and a toothpick inserted into one comes out clean.

So there you go.  While butter is still often cheaper than avocados, this is a great healthy option if you have one laying around and aren't in the mood for guacamole!

1.06.2012

my 100th post!!!

It's been almost a year since I started this blog, and I'm writing my 100th post.  Kind of surreal.

This might be anti-climatic for such a momentous occasion, but I've been wanting to show this baby off for awhile now.


She (I don't know why furniture gets a feminine pronoun, but it works!) was a little rough when I first found her on Craigslist last month; covered in scratches and dog hair, and so wobbly that even dropping a set of keys on top made her shake.  I almost backed out of the sale, but the seller lived pretty much as far away as you can get from my house and still be in the same county, so I figured I'd go for it if only to justify the gas money I felt I had just wasted.

She cost just $15, and since my son's naptime was drawing near I didn't attempt to haggle but just threw this crazy thing in the back of my car.  Then she sat in my mudroom for a few weeks until my parents visited after Christmas.  It was then my dad said, "Hey, if you have any wood glue I bet I can fix that wobble."  Music to my ears.

So after some well-placed wood glue and some patience (all on my Dad's part) and a nice coat of Pledge (okay that part was me!!) she looks SO much better.  Almost to the point where those little scratches and imperfections are just great character (and really they're not as noticeable anymore now that they've been given a good polish).

One day I might touch up the paint on the legs a little, but for now she's just fine for our foyer.  We've had a mirror on the wall in there for awhile and it was just crying out for a table to put underneath.


Not sure what I'll put on that bottom shelf.  Maybe a small stack of books?  With a toddler in the house I'm not sure what would be a good idea.  :o)

Anyway, if you're reading this, thank you.  Looking forward to the next 100 posts!

1.05.2012

january birthdays

This past week I had the great pleasure of making birthday shirts for two special little ladies.

Remember the owl birthday shirt I did last month?  I got to make another one, only this time for a soon-to-be two-year-old.  Since there's more usable space on a 24-month-sized shirt as opposed to a 12-month one, I got to make the letters and other elements a little bigger so they would really stand out.


The other girl is turning one, and her party will have an "over the rainbow" theme.  Her mom and I put our heads together and came up with this.  Not bad considering all of our communication was over Facebook!  It was fun using all the colors (especially since most of the colors were already in my fabric stash!).


I won't be able to see the shirts on the girls in person since both live out-of-state, but I'm hoping I'll get to see some pictures at some point!  :o)

1.04.2012

in the kitchen: pumpkin spice cinnamon rolls


 About a month ago, I came across this recipe for cinnamon rolls that had squash in them.  I was intrigued so I decided to give it a go.  And wouldn't you know it, the things were actually really tasty.  The squash was a great substitute for butter or oil, and they didn't affect the taste of the rolls at all.  However, I wasn't as impressed with the "glaze" the recipe called for to go on top.  Call me old-fashioned, but all cinnamon rolls require icing of some kind.  I hope you agree.

Fast forward to Christmas Eve.  I decided to try this recipe again, only using pumpkin instead of squash and making an icing to go on top instead.  The result:  deliciousness.  My husband and in-laws loved eating these on Christmas morning (though strangely enough, my toddler wasn't interested in partaking in gooey, cinnamon goodness so his opinion is unavailable at this time...weirdo!).

Here's my updated recipe.  I used my bread machine to knead the dough, so if you don't have one of these wonderful appliances I'd suggest looking at the original recipe and follow the directions to knead it by hand.  Either way, you can do most of the work the night before and then bake them off in the morning, so that's a bonus.  Who wants to get up at the buttcrack of dawn to make cinnamon rolls?  Not me.

A friendly word of caution...this dough is REALLY sticky.  Make sure you really flour your hands, your rolling pin, your counter, EVERYTHING.  I might try adding another 1/2 cup of flour to the dough next time to see if that does anything.  Either way, it'll roll out okay as long as you make sure all your surfaces are floured (if that's even a word...okay, it is now).  Okay, on to the recipe.

Anne's Pumpkin Spice Cinnamon Rolls
(adapted from Cooking Light and Money-Saving Mom)

The Rolls.
1 cup warm water
2 1/4 teaspoons yeast
1 tablespoon sugar
2 1/2 cups bread flour
1 1/4 cups all-purpose flour
1 teaspoon salt
1/2 teaspoon cinnamon
1/4 teaspoon nutmeg
Dash of ground cloves
1 cup pumpkin puree
1 tablespoon canola oil

Combine first 3 ingredients in your bread machine's baking pan and let sit for 10 minutes.  In a separate bowl, combine both flours, salt, cinnamon, nutmeg, and cloves, stirring with a whisk.  Once the 10 minutes are up, add the pumpkin puree and the oil to the baking pan, followed by the flour mixture.  Put the baking pan in the machine and choose the "dough" setting.  {At one point while the machine was kneading the dough, I realized it was really sticky and not really incorporating well.  So I added about 1/2 cup all-purpose flour to the pan and helped the dough along with a spoon.  Still experimenting with this part!}

The Filling.
3-4 tablespoons melted butter
3/4 cup brown sugar
2 teaspoons cinnamon

Once the dough has finished rising in the machine, take the pan out and punch the dough down.  Let it sit for five minutes then turn it out onto a floured surface.  Use a rolling pin coated in flour to roll the dough into a rectangle (roughly 12 X 20 inches, doesn't have to be exact or anything).  Combine the 3 ingredients listed above in a small bowl and then rub all over the dough rectangle, leaving a 1/4 inch border on all sides.  {In hindsight, it may have been easier to brush the melted butter on the dough first, then sprinkle with the cinnamon and sugar and rub it in that way.  Just a thought.}  Roll the dough up, starting with one of the long sides.

Now you're ready to cut.  I used the tutorial found here.  It's the easiest, cleanest, and fastest way to do it.  Dental floss, who knew??  :o)  Anyway, first I used the floss to make little hash-marks in the dough to divide it into about 16 rolls, then followed the directions on the tutorial to cut the rolls out.

Place the rolls cut-side-down in a 13 X 9 glass or ceramic baking dish coated with nonstick spray.

Now, if you've done all this the night before, all you have to do now is cover the dish with plastic wrap and put it in the fridge.  I did leave mine out for about half an hour just to let them rise a little more before going in the fridge, but I really don't know if it made a difference or not since they were still even bigger by the next morning.

Anyway, whenever you want to eat them, bake them at 350 degrees for around 20 to 25 minutes.  Just watch them and once they look golden brown, take them out and IMMEDIATELY spread the following ooey gooey goodness all over them.

The Icing.
1 teaspoon pumpkin spice coffee creamer (or milk with a little cinnamon mixed in if that's easier)
1 1/2 cups powdered sugar
4 tablespoons melted butter
1 teaspoon vanilla

Mix all ingredients in a bowl using a whisk or handheld electric mixer.  Spread evenly on freshly baked cinnamon rolls.  Enjoy!

YUM.  These rolls are softer than traditional cinnamon rolls but are just as delicious.  I used the coffee creamer in the icing on a whim since I had it on hand, and I'm so glad I did.  Since you just use a teaspoon, it's not overkill at all.  Just enough flavor to complement the pumpkin and spices in the rolls.

Obviously this recipe is still somewhat of a work in progress (hence all the sidenotes and stuff).  But this preliminary version has already exceeded my expectations so I don't think I'll tweak it all that much.  I'm just thrilled and amazed that this instance of recipe-morphing actually worked!  :o)

Linked up to Creations by Kara!
Related Posts Plugin for WordPress, Blogger...