5.31.2011

eat your veggies: zucchini calzones

 
{see the yummy cheese oozing out of that calzone on the right?  YUM. }


Don't you love it when some odds and ends from your fridge turn into something pretty good?  I whipped these up for lunch today and while they looked pretty scary when I first put them in the oven, they came out looking much more inviting.  And you can't beat getting a serving of veggies hidden within a yummy pocket of bread and cheese and pizza sauce!

These would work with any combination of meats, cheeses, and veggies.  I just used what I had on hand.  Next time I might try to make a whole-wheat pizza dough, bake a big batch of these, and freeze them.  Especially if my toddler ends up liking these too!

The Ingredients.

1 roll of refrigerated pizza dough
1/2 cup pizza sauce
1 to 1 1/2 cups shredded mozzarella cheese
One small zucchini, thinly sliced

The Method.

Heat a skillet over medium-high heat.  Saute the sliced zucchini in a little olive oil, salt, and pepper.  Add any other spices you want (garlic powder or oregano would be good!). 


Once the zucchini is a little brown, soft, and starting to fall apart, transfer it to a plate lined with a paper towel to get some of the oil out.

Unroll the dough out and use your hands to gently press it down until it's about a quarter-inch thick.  Use a knife to divide it into six rectangles.

{Yes, that's how gimpy my dough looked.  For some reason, pizza dough does not like to cooperate with me.  Not to mention I have a small heart attack every time the stupid tube pops open.  Anyway, if there's any tears or holes, just repair them the best you can.  No biggie.}

Start loading your toppings.  I decided to do a layer of sauce, then the zucchini, the the cheese.


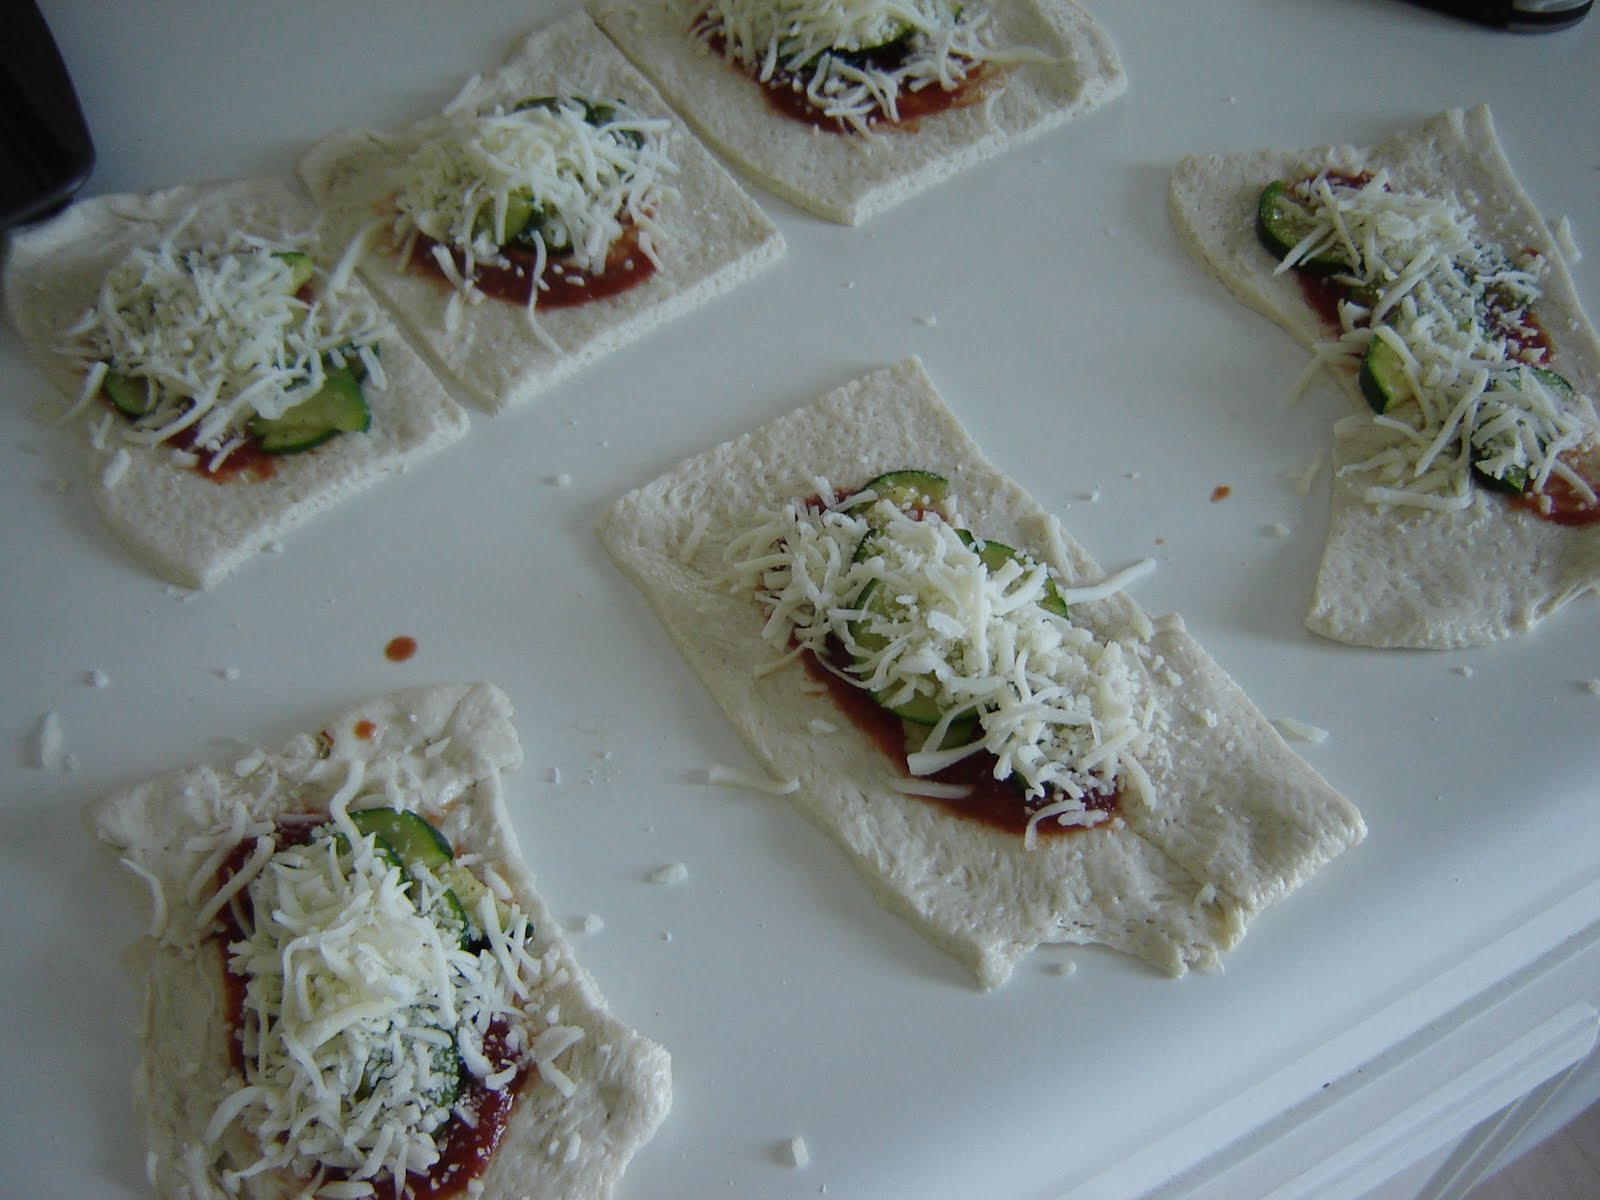
Then roll them up.  I tried it a couple of different ways; I think the easiest way is to fold one short side over the filling, then the other short side on top of that, and then pinch the open sides shut.  If that makes any sense at all.  Guess it depends on how stretchy your dough is and how much patience you have.  I was hungry and just wanted them done, so mine ended up like this:


Yikes.  Be sure to cut a slit in each calzone to help the steam escape, but if yours end up like mine you probably won't have to!  Put them on a greased baking sheet and bake at 400 degrees for 12 to 15 minutes or until golden brown.  I sprayed mine with nonstick spray before I put them in the oven to help the browning process.  And they came out like this:


Not too shabby.  Let them cool down for at least five minutes before eating.  I really liked these a lot; the zucchini had a good texture since I sauteed it first, and it kind of just melted into the cheese and the bread so it wasn't too overpowering.  Next time I might try spinach.  Or sliced tomatoes.  I think just about anything would work here.  

Now go eat some veggies.  :o)

5.25.2011

in the kitchen: chocolate-chip banana bread

I have a confession to make.  I hate banana bread.  I love the way it smells when it's cooking, and will even lick the spoon when I'm done mixing up the batter, but for some reason once it takes on loaf-form I can't stand it.  I have a theory that just might explain this phenomenon though.  Back when my mom would pack my lunch for school, I quickly learned that sandwich + banana [divided by a factor of being in the same paper bag] = sandwich bread that tastes like bananas.  Some people may not mind this.  But I guess it bothered me enough to create a permanent aversion to banana bread.

Then one day early on in our marriage, my husband casually mentioned that he liked banana bread.  I snagged the recipe from my mom, added a personal touch of chocolate chips, and just like that banana bread was back in my life again.  I still don't like it, but according to my husband, it's pretty yummy.  So here you go.

The Ingredients.

1/2 cup butter
1 cup sugar
2 eggs
1 cup mashed bananas (about 2 or 3 very ripe bananas)
1 tablespoon baking powder
2 cups flour
1 cup chocolate chips

The Method.

Preheat oven to 350 degrees and spray a loaf pan with nonstick spray.  In a large bowl, use a handheld mixer to cream the butter and sugar together.  Add the eggs and bananas and mix until combined.  Stir in the flour and baking powder using a wooden spoon (you could still use the mixer at this point, but that usually makes a very nice flour mist all over your counter so I just opt to do this part by hand!), and then mix in the chocolate chips.  Spoon batter into the loaf pan, smooth the top, and then bake for 40-50 minutes.  I usually stick a butter knife in the center, and if it comes out mostly clean, it's done!  :o)

Hope you like it!

5.21.2011

striped table runner


Last night I made a simple runner for our kitchen table using a couple of cotton prints I found on clearance.
{Hmm...I tend to say "on clearance" a lot, don't I?  I'll admit; there was definitely a period of time where I was addicted to buying cute clearance fabric.  And now I'm trying to use some of it.  Drawers stuffed with fabric do not close all that easily.  Okay, now you're all caught up.}

I didn't want the runner to stretch across the whole length of the table; in my opinion, that gets awkward for whoever sits at either end.  "Is it a placemat?  Is it a tablecloth?  Do I move it out of the way?  Why is it touching me??"  :o)

Plus my toddler is going through a phase where he thinks anything he can reach must be up for grabs, so he's always bringing me placemats, napkins, pencils, whatever.  So this runner is no more than a yard long, I'd say.  That's right, I didn't measure anything.  And the blue stripe was an afterthought, but I'm so glad I did it because it really makes the whole thing much more interesting.

I found this cute basket at Goodwill last week, and I'm thinking that filling it with lemons and/or limes would look so cute and summer-y on this runner.  But I only have a couple of lemons, and zero limes.  I guess for now this will have to do.


Maybe lemons will go on sale soon...  :o)

Linking up to Creations by Kara!

5.20.2011

super-quick bathroom curtain


So I finally got around to sewing something today...well, if you call a simple hemming job "sewing."  Which I do.  So there.  :o)

This was a curtain panel I found at Ross about a year ago.  I liked it, but it was the only one they had and for most of my windows, I would have needed two of these panels for adequate coverage.  I saw that it could work in my guest bath, but was really long, so today I hemmed it the best I could and hung it up.
 
And let me just say that sewing sheer fabric is kind of annoying.  I used a short stitch length and used a basket to "weigh down" the panel so it wouldn't slide around while I sewed, but my seams are still a bit crooked.  But then I had an epiphany.  The end of the panel that I hemmed (crooked seams and all) looked a lot like the top of the panel, which already had the pocket for the rod in it.  So I just flipped it around, used my gimpy sewn-up end as the rod pocket, and used the nice, professionally-sewn top for the bottom.  :o)

What do you think?

I'm worried it clashes a bit with the shower curtain, but maybe that's just because I'm not used to it yet.  And I felt comfortable using a sheer curtain in a bathroom because this window (like every other window in our house) has blinds on it as well.  Although the only way some weirdo could look in is if he was standing in our backyard, but still, I'm a fan of modesty as well as letting some sunshine in.  :o)

I might have to do some more window treatments now...stay tuned!

5.16.2011

in the kitchen: chip-crusted chicken

Um, no I didn't die.  Let's just say I was in a funk last week, and really didn't do anything that creative.  :o)

To ease me back into posting, here's a really simple, really yummy chicken recipe.  Because chicken is good for you, but can get boring real quick if you're not careful.  This recipe is enough for two people but can easily be doubled...just figure a chicken breast and maybe a half cup more of chips per person.

The Ingredients.
2 boneless, skinless chicken breasts
1 egg
1 to 1 1/2 cups crushed baked potato chips (barbecue flavor is fantastic, but use whatever you have on hand!)

The Method.
Preheat oven to 400 degrees.  Cover a baking sheet with foil and spray the foil with nonstick spray.
Place chicken breasts in a ziploc bag and pound them until they are half an inch thick.  Take them out of the bag and cut them against the grain into 1 inch strips.  Set aside.
Put crushed chips in a shallow container (such as a pie plate).  {To crush the chips, put them in a ziploc bag and roll a rolling pin back and forth until they look like breadcrumbs.}  In another container, lightly beat the egg.
Dip each chicken strip in the egg, let the excess drip off, and then roll in the crushed chips until all edges are covered.  Lay on the prepared baking sheet and repeat with the rest of the chicken.
Bake for 10-12 minutes or until chicken is done.

As you can see, the chicken doesn't take that long at all to bake since it's in small strips and the oven temperature is high.  And while you can experiment with the flavor of chips (sour cream and onion might be good too!), I would recommend that you stick to the baked variety.  I tried regular chips one time, and they made the chicken kind of greasy.  I could hear the fat on the them sizzling in the oven, and it just didn't result in the crispy texture that the baked chips do.  One thing I might try next time is to place a wire rack on top of the baking sheet and then bake the chicken strips that way; maybe that will prevent soggy-bottomed chicken.  Which happens a little bit with this recipe, but doesn't really affect the taste of the chicken overall.  Which is good, because it's yummy if I do say so myself.  :o)

Enjoy!

5.06.2011

vinyl pocket bib


Back in January I made a really awesome vinyl bib for my son since I was really tired of washing regular bibs all the time.  I had seen some with pockets, which I thought was ingenious since somehow even with a bib and a highchair tray, food was still finding its way onto my kid's lap at every meal.  So this is what I came up with:


I sewed velcro on for the straps, which incidentally is a huge pain in the rear.  So for the pocket, I tried just sticking the velcro on without sewing it down, but it came off after awhile so I learned how to install snaps shortly after.  :o)  Long story short (too late!), after a couple of months one of the snaps fell out since I had made the hole too big, and it was pretty much beyond repair.  Sad day.

Back to washing bibs...constantly.

So today I decided that enough was enough.  I still had some of the iron-on vinyl leftover so I thought I'd try it again.  Sturdy, home decor-weight kind of fabric works the best for this kind of project, but I didn't really have much in my stash.  I did, however, have a lot of cute cotton prints.  I still had some heavy-duty fusible interfacing leftover from making that tote bag, so I ironed it onto a really cute dinosaur fabric I found in the clearance section at Jo-Ann awhile back.  That made it a lot less flimsy and perfect for a bib. 

I used snaps for the pocket again, but wanted velcro for the neckstraps since it makes it easier to get on and off.  The velcro I used this time must have been REALLY sticky because it kept gumming up my needle and the thread was getting all knotted up.  So one piece is sewn on, and the other isn't.  I figure if it comes off I can just put another piece on!  It just wasn't worth the hassle (and I went through a couple of needles trying to get that first piece sewn down so that made it twice as annoying).

So what do you think?  See how you can un-snap the pocket for easy cleaning?


Maybe you can tell me why there are also snakes and snails grouped in with the dinosaurs.  Not sure what the designer was going for there.  Oh well, it's still pretty cute.  We'll see how this works at breakfast tomorrow!  :o)

5.03.2011

eat your veggies: cheesy squash patties

{Any of you have a catchier, more appetizing name for this recipe?  Let me know...haha!}

It seems to me that every year, the recommended daily amount of servings for fruit and vegetables increases.  Fruit usually isn't a problem for me; veggies get trickier.  I like most of them, but my husband hates most of them, and our son falls somewhere in between.  I usually get lazy about eating enough veggies since at times I'm the only one eating them, but I've resolved to do better.  Wanna join me?  Keep checking back for more "eat your veggies" recipes and ideas!

Here's a recipe I kind of made up.  I was watching the Food Network a year or so ago and noticed Paula Deen making some yummy patties out of squash and zucchini.  I tried the recipe, but had a few issues.  One, she didn't use enough cheese (I know, go figure.  She usually puts a pound of butter in everything but for once opts to go healthy).  Two, she was kind of unclear about how thick to make them.  Mine turned out kind of mushy in the middle.  Yuck.  And three, the recipe was intended for more than just one veggie-eating person, so there was a lot leftover (and they were even mushier warmed over.  Double yuck).

So I adapted the recipe to make it work for me.  This recipe uses just one or two pieces of yellow squash (depending on size), but you could also substitute zucchini or do a mixture if you prefer.

Cheesy Squash Patties (really, the name is killing me!  Trust me, they taste better than they sound!)
(adapted from Paula Deen)

The Ingredients.
2 small-to-medium-sized squash
1/2 cup seasoned breadcrumbs
1/4 cup grated Parmesan cheese
1/2 cup shredded cheddar cheese
1 egg, lightly beaten
Dash of salt
Dash of pepper

The Method.

  • Heat a large skillet over medium-high heat.  Either spray with nonstick spray, or use about a tablespoon of olive oil, whatever you prefer.
  • Wash and dry the squash, cut the tips off, and then shred with a grater.
  • Gather up the shredded squash in a clean kitchen towel and wring to get all the excess liquid out.  I find the cotton towels work better than paper towels for this job.
  •  Place squash shreds in a medium-sized bowl.  Add the rest of the ingredients and mix with clean hands until combined.  Add more breadcrumbs or cheese as needed.
  •  Form into small patties, about two inches in diameter, and about a half-inch thick.  Working in batches, lightly pan-fry patties in the skillet, about 3-4 minutes per side.


  • They should be browned on either side when they're done (it also helps to lightly press on them with a spatula once you've flipped them; make sure you do this after they've been flipped though since the raw sides will stick to the spatula).  Transfer to a paper-towel-lined plate to cool slightly, and continue with the rest of the patties.
 And there you go!  A quick, yummy way to eat your veggies.  Yes, in this case, the veggies are surrounded by cheese.  But the ratio of squash to cheese is actually quite decent if you think about it.  And I used the nonstick spray for mine instead of the oil, so that cut down on the calories and fat as well.  I've never tried these with reduced-fat cheese, so that might work too (I just don't eat reduced-fat cheese.  I think it's gross.  I'd rather just eat the real stuff in moderation.  :o) ).

This recipe makes about 10 patties, so make sure you share them.  Heating up the leftovers in the microwave equals mushy, not-as-yummy-as-before mounds of squash, so these are definitely best right after you make them. 

What do you think?  I think you should try them.  Then you could say you ate a vegetable today.  :o)
Related Posts Plugin for WordPress, Blogger...